When we arrived home, I
took the truck straight to my shop and tested the AC system.
If you don't have an advanced scanner that will pull all of
the diagnostic trouble codes (DTCs), you can check for power
and ground at the AC compressor clutch coil. I had voltage
but the compressor wasn't kicking in.
I spent the evening
reading my Dodge workshop manual and everything else I could
find about the compressor coil and how it is activated. What
I read didn't please me much at all. It seems that the
clutch coil gets its power from the fuse box. However, the
fuse box is no longer just a panel with wires and fuses. The
fuse box is actually named the Totally Integrated Power
Module (TIPM). Instead of external relays to control things
like the compressor clutch coil, it uses solid state
devices. If it sees that a circuit is pulling too many amps,
the TIPM can and will shut that circuit down. Apparently
that is what has happened to mine.
|
|
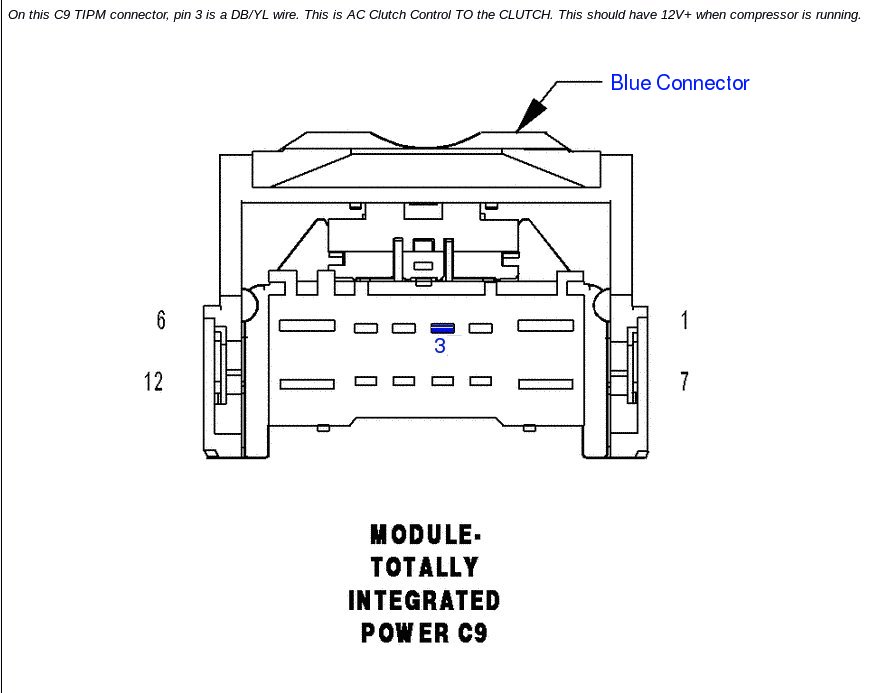
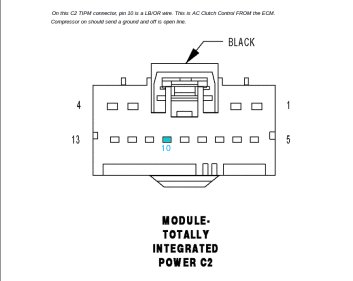
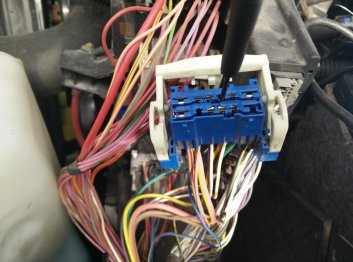
The
black C2 connector on the back of the TIPM.
Click the image to read the notes.
|
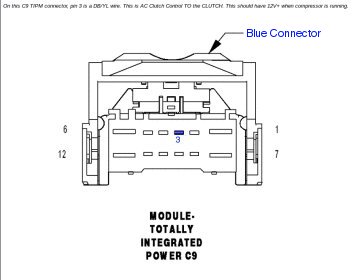
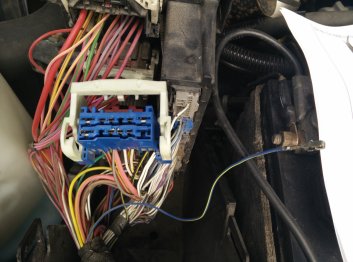
The
blue C9 connector.
Click the
image to read the notes.
|
When I jumped the compressor clutch coil
directly from the battery, the coil was able to pull in the
compressor clutch, giving me AC again, but it was is pulling
6+ amps. The spec for the coil in my workshop manual stated
that it was supposed to only pull 4 amps maximum. When
checking the two wires that go to the coil connector from
the TIPM circuit, I was reading about 11 volts, which was
within specs, but the circuit carried no amps at all. It
wouldn't even light a test lamp. What I though was strange
is that if I grounded one of my voltmeter probes and probed
either of the two wires going to the coil connector, both
were showing the same 11 volts. It appeared that something
was amiss in the TIPM as well as the compressor clutch coil
drawing too many amps.
I started trying to perform the diagnostic checks in the
manual, but to do most of them, you need some way of reading
the voltages in the system. This is done at the dealer by
using the StarScan ODB scanner or similar. I didn't have one
of those. There is an interesting thread on the clutch coil
and a possible work-around here:
http://www.cumminsforum.com/forum/3rd-gen-non-powertrain/306332-possible-diy-fix-ac-compressor-clutches-going-bad.html.
While this work around wouldn't work for me as the output
from the wires going to the compressor coil couldn't produce
enough current to activate a relay, reading through the
whole thread gave me a little better understanding of what
was going on in the circuit.
|
|
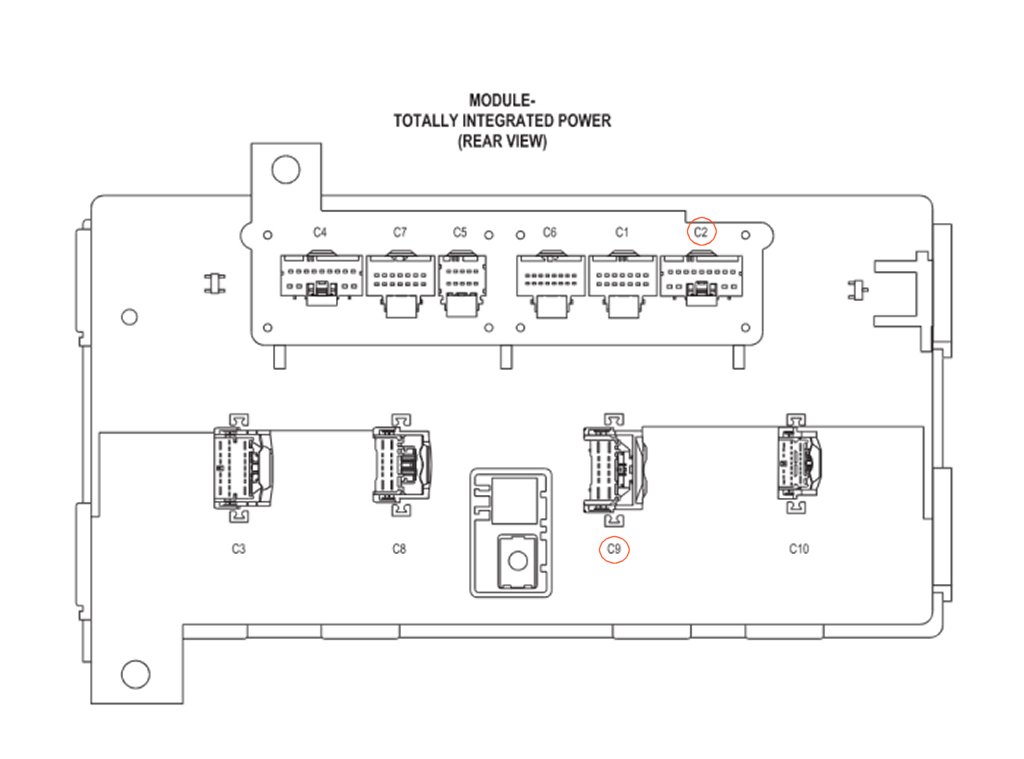
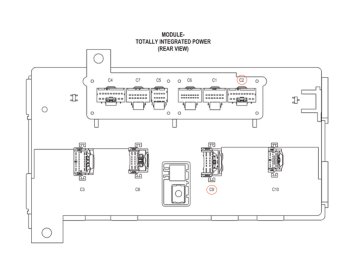
An
image of the back side of the TIPM showing the
locations of the plugs.
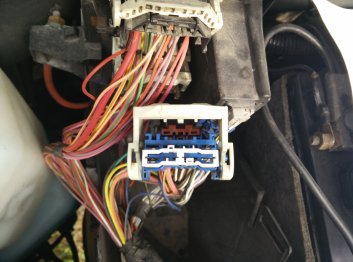
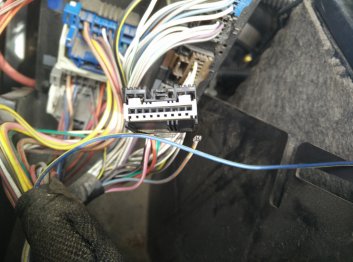
|
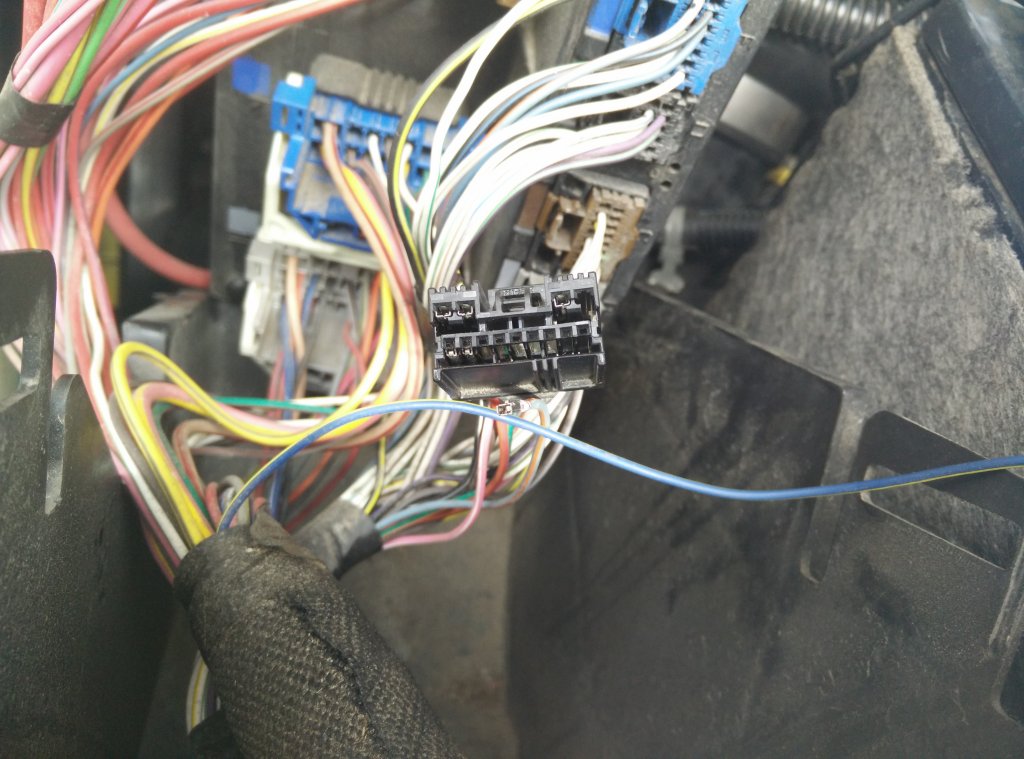
C9 plug removed from the TIPM so I could
isolate the wire.
|
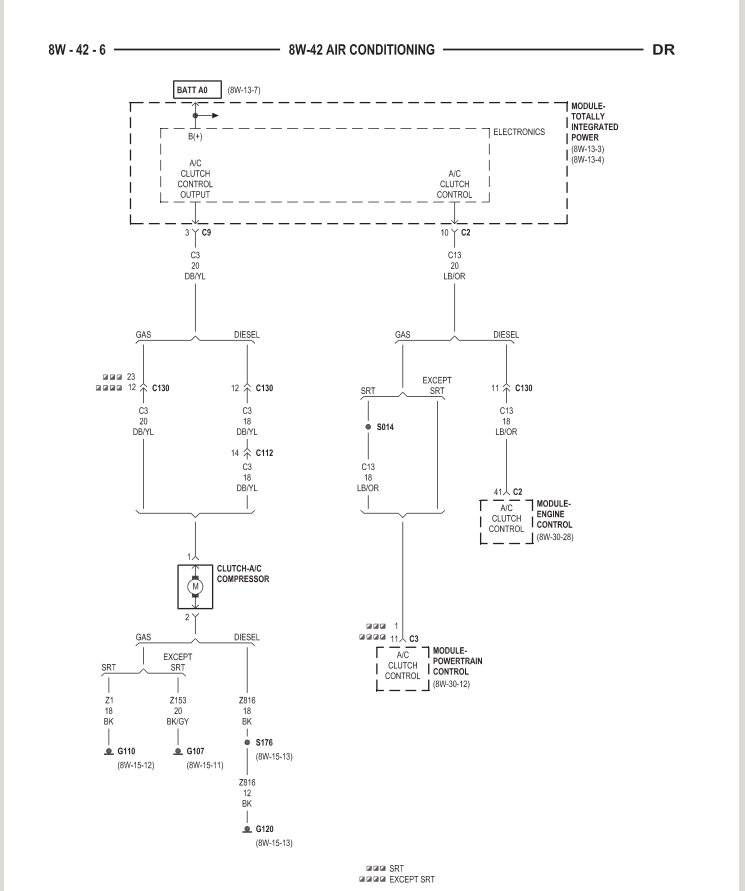
I pulled out the TIPM and checked the dark
blue wire with a yellow tracer coming from pin 3 of the C9
connector of the TIPM and found that I had the same ~11
volts I had at the compressor connector. This is supposed to
be the positive wire to the clutch coil. The negative wire
on the compressor connector appears to go through the AC
pressure transducer on the side of the compressor and
eventually to ground. I then checked what was said to be the
trigger wire to supply power though the DB/Y wire just
mentioned. This wire is on connector C2 pin 10 and is light
blue with an orange tracer. It comes from the powertrain
control module on the diesel model and should supply a
ground to the TIPM when the AC switch is activated. I got 11
volts when I probed this wire.
For a test, I probed the LB/OR with a grounded probe. This
would cause the compressor coil to activate, but not stay
activated. It would pulse the clutch on, then off, three or
four times and then stay off. If I removed the probe and
then probed again, the same on - off routine would start
again.
I tested all of the components in the system the best that I
could without having StarScan and even pulled the center
dash to check the operation of the AC switch. As far as I
could tell without the proper diagnostic tools, everything
appeared to be working up to the powertrain module or the
TIPM.
We needed to use the truck the next day and it was going to
be hot, so I worked up a quick and dirty switch to a relay
to power the compressor. The AC worked fine in the morning,
but only lasted 1/2 day. I lost the ability to turn the
compressor on around noon and we spent the rest of the
afternoon driving in a hot truck - or at least I did. My
wife picked up her Lexus from the upholstery shop and got to
drive home with AC. I had to sweat.
|
|
The
wire is removed by inserting a thin screwdriver
under the connector.
|
The
wire is removed.
|
When I got home, I put
an ohm meter across the coil terminals and it had died. Open
circuit. There was nothing more that I could do at this
point but to order a new coil. I ordered the coil from
coldzone111 on Ebay - $45.77. The seller had great ratings
and a few of the comments gave a thumbs up on this coil.
I had also done some
more reading in the manual and found that every test was
prefaced by making sure that you checked for trouble codes
and repaired those first, then cleared the codes. I needed
some way to do that. I decided on the AutoEnginuity (AE)
software and dongle along with the Chrysler add-on software.
My main reason was that I could add the Toyota/Lexus package
for my wife's car if we needed it in the future. The AE
Chrysler software would also let me pull codes from my son's
Hemi Ram and his wife's Jeep JK. If I had no other vehicles
to consider, I might have gone for one of the performance
programmers that also pull and clear codes. At almost $500,
the AE software, dongle, and Chrysler add-on wasn't cheap,
but I figure it will pay for itself eventually. I sent the
AutoEnginuity folks a couple questions from their contact
page and was pleasantly surprised when I received an answer
back within a few hours. Their support has been surprisingly
good and this is something that you can't say about many
companies these days.

|
|
The
C2 connector has been removed and the white
plastic protector has also been pried out.
|
The
white plastic pin connector has been reinstalled
|
I received the coil in a couple days. Pretty
quick shipping and the coil looked good. Installing the coil
without removing the compressor from the truck was a pain in
the butt. It is easy enough to pull the 4 bolts to drop the
compressor, then pull off the clutch plate, pulley and coil,
but trying to line up the coil and press it back on while on
your back under the truck is not a whole lot of fun. It took
a couple tries before I got the coil fully seated. An
inspection mirror on a stick allowed me to look at all sides
of the coil and make sure that it was seated as far as it
would go. To allow me to press on the coil, I used a 1"
thick ring of aluminum that I had saved in my metal scrap
bin. A wooden ring about the size of the coil would work
just as well. I placed this on top of the coil then placed
the clutch disk on top of that and used a longer 6 mm bolt
in place of the stock clutch disk bolt. I ran the bolt down
as snug as I thought a 6 mm bolt could handle, then tapped
on the clutch disk with a compothane "no bounce" hammer.
This is a plastic hammer with metal shot inside and may also
be referred to as "dead blow" hammer. Once I got the coil to
move a bit, I retightened the 6 mm bolt and repeated lightly
hitting the clutch disk. I repeated this until the coil was
fully seated on the compressor.

|

|
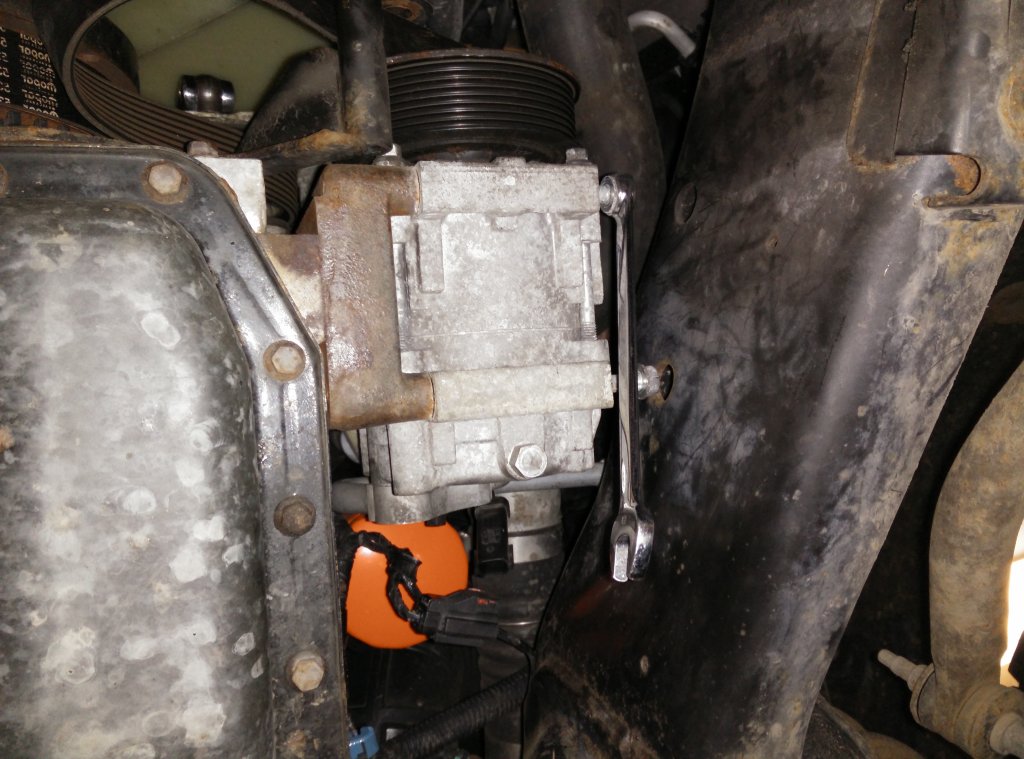
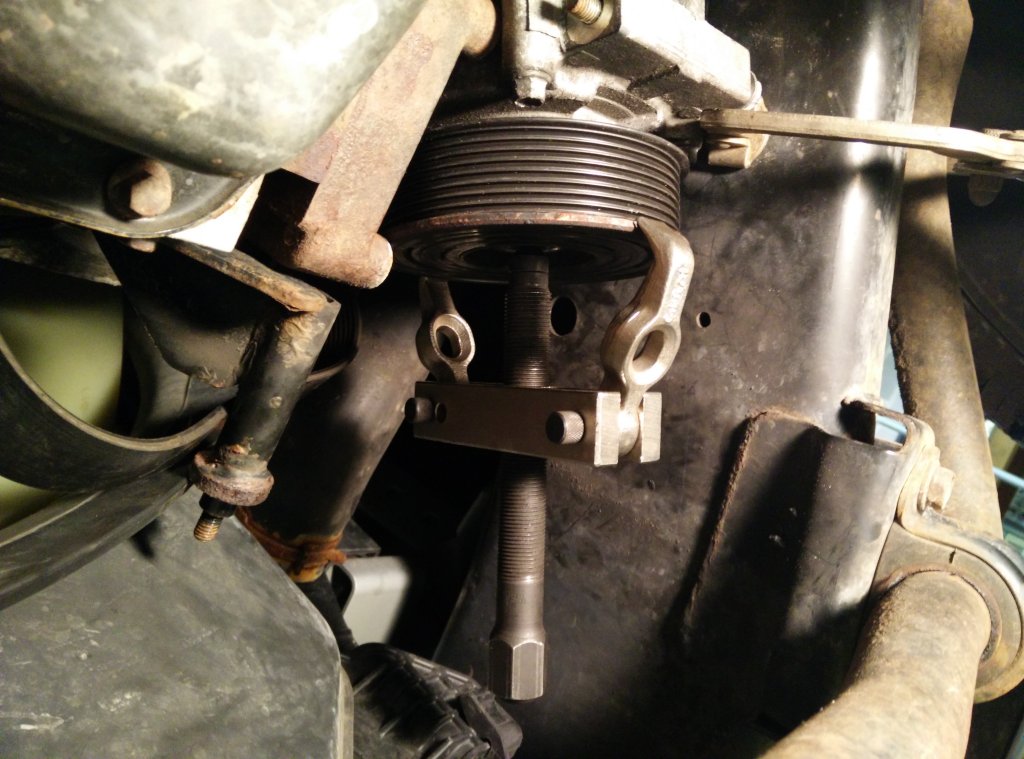
There
are four bolts to unhook the compressor.
|
Using
a too-small puller to remove the AC compressor
pulley. This barely worked.
|
I used the same technique to install the
pulley. It was slow going, but I finally got it seated. I
should have removed the clutch disk and inspected it and the
pulley face before I ordered the coil. If I had, I would
have ordered a new clutch disk and pulley at the same time.
My clutch disk and pulley are no longer flat where the
contact each other. There are grooves where the clutch disk
has been slipping against the pulley face. I will order the
new parts soon, but am guessing that the current ones will
last throughout the summer.
With the new coil installed, I ran a couple wires from the
battery to test it. It worked well and I again got cold air
from the vents. Since I didn't know what fixing the TIPM was
going to entail, I wired up a switch and relay so that I
could manually control the compressor clutch from the car.
This time I wired the relay coil hot lead (terminal 86) to
the #40 (20 amp) fuse in the TIPM which gives power to the
cigar lighter when the ignition switch is on. I wired the
negative side of the relay coil (terminal 85) to a switch
that I attached under the dash to one of the trim screws.
The other connector on the switch was wired to ground under
the dash. The power lead of the relay (terminal 30) was
wired directly to one of the batteries through a 15 amp fuse
and fuse holder. The power output of the relay (terminal 87)
was wired to the plus side of the compressor connector. I
ran a wire from the negative terminal of the battery
directly to the negative side of the compressor connector.
This worked well for the one day I needed to use it before
my AE software arrived.
The temporary circuit to control the AC compressor clutch
coil is NOT a fix that I would want to use for an extended
period of time. If you need to use this circuit, you should
be aware that there is no component in the circuit that will
shut off the compressor if the Freon pressures become too
high. A safer circuit could be made by adding a high
pressure switch in place of the AC transducer and wire this
switch between terminal 85 of the relay and the on/off
switch. Without a way to shut off the compressor clutch coil
when the system pressures rise above the recommended level
(460 PSI), you stand a chance of AC compressor damage or
leaks caused by too much pressure. If I was looking to make
a circuit that would be used for a longer time, I would also
need to find a way to increase the flow of air over the AC
condenser when the AC is used when idling for extended
periods of time, such as stop and go traffic.
I finally got the AutoEnginuity software. I had a little
trouble getting it installed, but wouldn't have had the
trouble if I ran more current Windows software. I run Linux
exclusively these days. I had a couple of old laptops that
came with Windows, but had been switched to Linux before
they were retired. One had come with Windows 2k Pro and the
other with WinXP Pro. I had decided to remove the Linux on
the newer of the two and reinstall the XP software that came
with it, but I couldn't find the disk. I did find the Win2K
disk and since it was supposedly supported by the AE
software, installed Win2k. When I went to install the AE
software, it installed OK, but when I went to open the
Giotto program that runs the scanner, I got an error:
ScanTool.exe - Entry point not found
The entry point is Wow64process and could not be
located in the dynamic link library Kernel32.dll |
It looked to me like the software was looking for a 64 bit
kernel on a 32 bit machine. I couldn't find anything on the
AutoEnginuity site, so I sent them an email. This was very
early in the morning and they hadn't opened yet. I decided
to do some sleuthing on my own. I pulled out an old desktop
computer with WinXP Home version on it and loaded the AE
program. This time when I went to launch it, it launched
without error. Hmmm. For some reason, it looks like the
software didn't like Win2k.

|
|
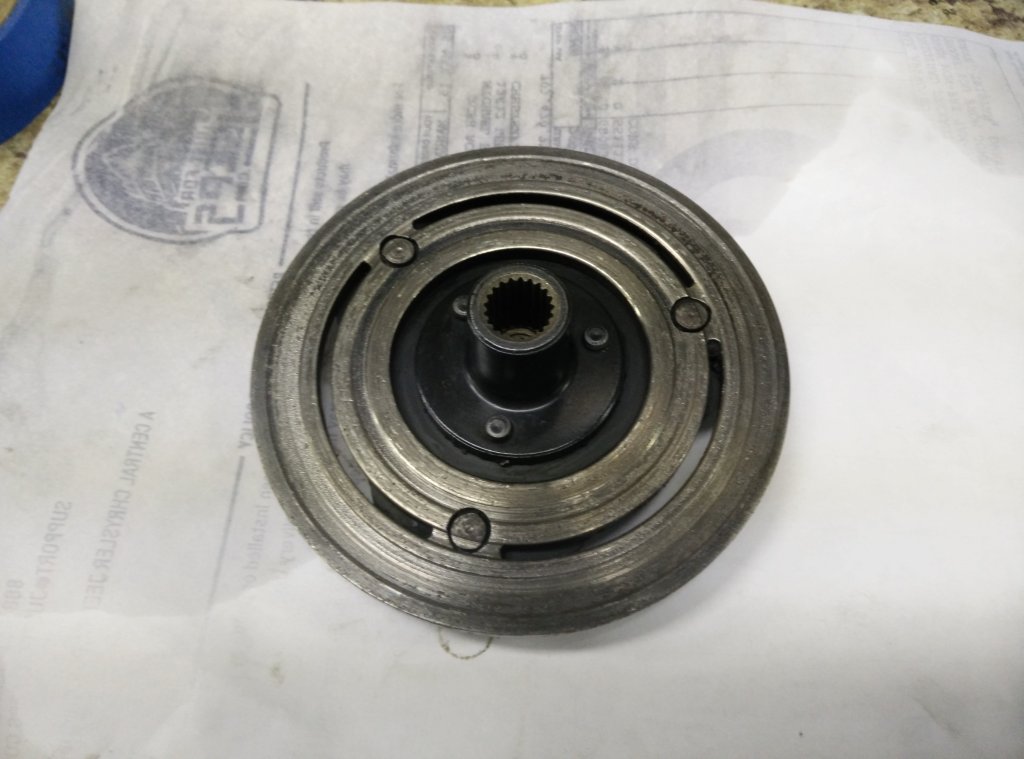
The
compressor pulley and coil have been removed and
the snout on the compressor has been cleaned and
lightly oiled.
|
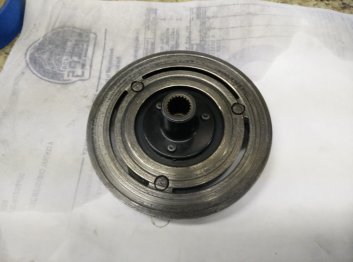
The
compressor clutch disk has been wearing for the
past nine years. The face of the pulley has the
same wear lines. I will replace both soon.
|
I again dug through the
last 10 years worth of CDs and this time I came up with the
original XP disk for the laptop I had installed Win2K on.
Rather than do a fresh install, I just ran the upgrade.
About 40 minutes later, XP pro was installed. Since this had
been an upgrade and not a fresh install, the shortcut for
the Giotto scan program was still on the desktop. I clicked
it and the program launched. AutoEnginuity got back to me a
little later with a couple things to try, but I had already
solved my issues. Still, having anyone's support get back to
you the same day is pretty darned good.
Apparently the Chrysler
add-on program is loaded from the main installation disk and
that the dongle is coded to allow you to activate it. I was
a bit surprised that there wasn't a second CD to load. My
dongle didn't seem to be programmed to allow me access to
the Chrysler add-on package and gave the folks at AE a call.
While we were on the phone, I received an email with the
code to activate the Chrysler package. This did the trick
and once I got it activated, I was presented with more
screens and options than I knew what to do with. Most of the
options are abbreviated like HVAC for the heating,
ventilation and AC system. I was in the automobile service
industry for a couple decades and know my way around cars
pretty well, but many of the abbreviations meant nothing to
me. It is going to take me a while to get full use of this
product.
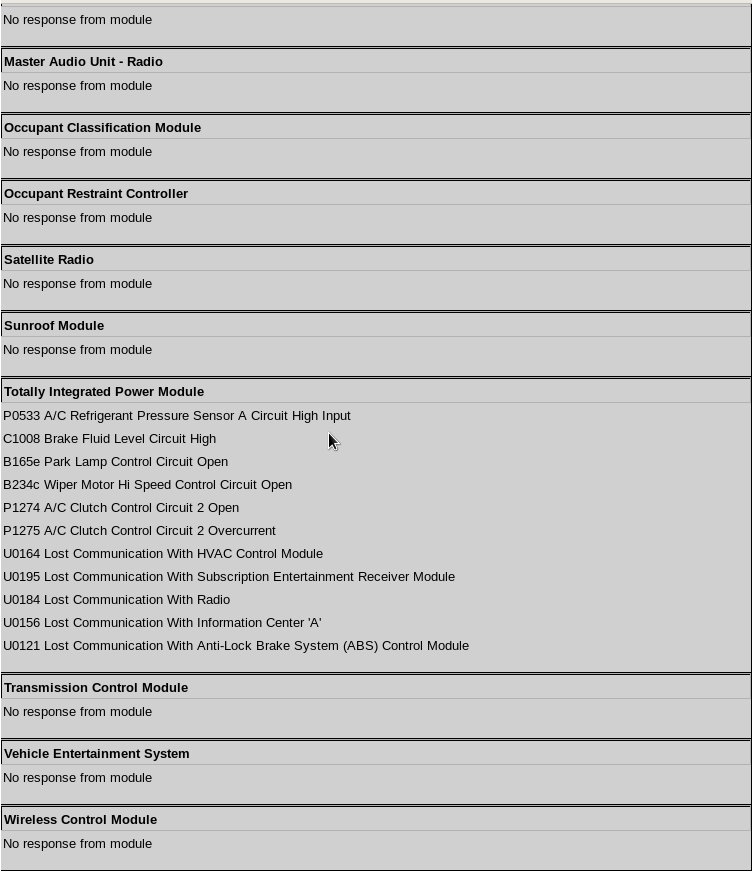
With some help from a
post on one of the diesel forums, I discovered that if you
click on "Change System" to "TIPM" then go to "Test
OnBoard System" tab --> "module configuration" you can pull
the diagnostic trouble codes (DTCs) for that system. You have
the choice of All, Current, or None. I chose current. I got
quite a long list - see the images below. I realized that
probably quite a few of these were from my pulling connectors
during my trying to diagnose why I had no ground on the LB/OR
wire on connector 2 of the TIPM. I decided that I would print
out the DTCs and then clear them to see if any came back.
Clearing the codes is a bit non-intuitive. The button to clear
them reads Clear MIL. MIL is the multifunction indicator
light. It was not on, so why would I need to clear it.
However, this button also clears the DTCs. When you click it,
you again have the choice of All, Current, or None. I chose
Current. Once you clear the codes, you're asked to cycle the
key switch to off, then on. I did this and pulled the codes
for the TIPM again. There was now only one single entry about
being able to communicate with the CAN bus. I figured that
since the workshop manual was adamant about having the codes
cleared before you tested the system, that it was worth a try
to unplug the dongle and fire up the truck. I started the
truck and hit the AC switch. The engine lost a couple RPMs as
the compressor clicked in and I again had air conditioning. I
did not clear the TIPM and am not positive that the AE
software will even allow me to do this. There is an option for
clearing the ECU, but I will do some more research on this
before I start messing with things that I am unsure of.
|
|
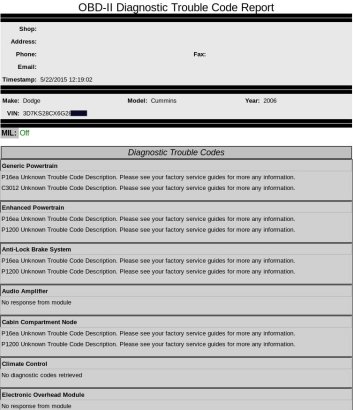
This
is the top portion of the AutoEnginuity ODB
trouble code report I ran after replacing the compressor
coil.
|
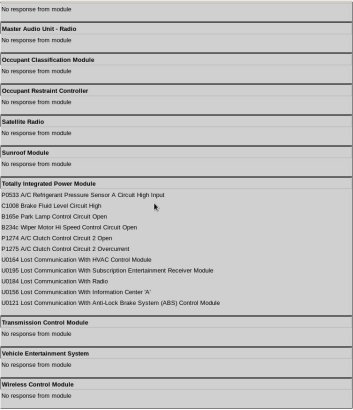
On
the bottom half of the report, you can see all of
the DTCs that pertain to the TIPM. I believe I set
most of the codes while checking the TIPM plugs.
|
I'd
like to give my thanks to the forum members over at
CumminsForum.com for getting me headed in the right direction
on this repair. The thread linked above saved me a lot of time
trying to diagnose this issue and hopefully this article will
add to the general knowledge about this repair.
On
the flip side, I am really disappointed in
Chrysler/Dodge/Jeep. I have read about countless problems due
to too strict of parameters being programmed into the TIPM.
The problems range from this AC issue, to vehicles not
starting, to having a headlight burn out and having to have
the TIPM system reset after you install a new headlight. What
kind of company makes a headlight replacement something that
has to be done at the dealership - even if a headlight
replacement is a little more involved (and much more
expensive) than the old "sealed beam" type headlights? I have
to say that this type of engineering makes me angry. Is
shutting down an electrical circuit when it gets a reading out
of it's intended parameters really any better than just have a
fuse pop if a circuit draws too much amperage? I guess if your
mission is to overly complicate the vehicle and tie the
customer to the dealership, it is.
I like
my Cummins diesel a lot, but it's almost 10 years old. I have
been toying with the idea of a new one. However this
experience has soured me on buying a new Dodge. I can't see
giving my hard earned money to any company who tells me that I
need to come back to their service department and pay them to
reset the system after I have replaced my own headlight.
Keeping this old truck going has much more appeal than it did
last week. Also, I think it is time that I start reading up on
what other car manufacturers are doing. I already hate the
idea of General Motor's OnStar system tracking the owner's
every move. I am hoping that I find one manufacturer out there
that doesn't feel that they have the right to track me or lock
me into their dealership network for simple repairs.