HOME
What's New

CPU Cooler
Programs
Introduction
AmnHLT
CpuIdle
Rain 
VCool 2.0 
Waterfall Pro 
Current Tests 
Test Archives

UDMA Driver 
Tests 
Windows 95
Windows 98
Windows NT

Way 2 Cool 
Projects 
Compaq 1800T
1800T Temp Monitor
Celeron-A
Going for 504
More on 504
Cheap Sandwich
BX6r2 Diode Fix
Condensation
Lap that Slug
Celeron PPGA
Journey to 1080
Building an NT Box
Heat Pipe 1
Heat Pipe 2
Heat Pipe 2.2
gp_Temp
gp_Temp4
gp_Temp5

Heat Sinks 
Aavid
A&C Prototype Sink
Alpha P125
Alpha P521
CPU Cooler
FullWay
Tom's Sink
Water Cooler 1
Water Cooler 2
Water Cooler 3
Water Cooler 4
*
Water Cooler 6
Water Cooler 7

Way 2 Cool
Thermometer
Thermometer 2
K-6 heat sink
Case Cooling
Heat Sink Tester
More Case Cooling
Klamath heat sink
Q500A Cooling
My Server Temps
Temp Calculators
CKS400 Rack Case
Fan Controller
Cooling Links
Downloads Page

Tips and Trix
Dual Boot Win95 / 98
Dual Boot Linux/NT4
D-B Linux/Win2k
Hot Flash your BIOS

Family Stuff
Prom / St. John
Providenciales

Email Jim

By Charlie Wathen
Removing the P2 Klamath Casing and Direct Mounting a Heat Sink 

With my new 300a in my system replacing my old P2 266, I decided to open the P2 casing before installing it in my wife's system. When I finally removed the casing, I was surprised to find that the P2, unlike its young Celeron brother, does not have direct
contact with the heatsink, but instead it touches a thermal plate that is an intricate part of the P2 cartridge. This thermal plate will then transfer the heat from the CPU to the heatsink. 

Another concern with the Klamath CPU is that it runs at 2.8 volts, and produces approximately 35 watts for the 233, 38 watts for the 266, and 43 watts for the 300 MHz CPU. The L2 cache chips also run hot, especially when overclocked.  Cooling can be improved by removing the P2 casing and mounting the heat sink directly on the CPU. This setup will look just like the Celeron CPU. With the CPU cartridge exposed to ambient conditions in the case, you should be able to overclock and not worry about heat causing errors. Some of the problems associated with overclocking the Klamath CPU are associated with the L2 cache chips running too hot. As I discovered inside my P2 266 cartridge, they do not touch the thermal plate and there is no way to cool them. The L2 cache is rated for 150 MHz (300 MHz /2), so owners of the 300 MHz CPU will have a more difficult time going higher than 338 MHz.

Before I continue, if you decide to do this, you will void your warranty on your CPU. You could also damage your CPU causing it to malfunction. You have to be patient and take your time. Do this at your own risk! If your CPU fails to work, or you destroy your casing, don't blame me or Jim.

Procedure: I scanned the net and found a small article on removing the casing at Heat Sink Guide.  Using this procedure, I was able to remove the Klamath casing. I will elaborate a little more on the procedure. 
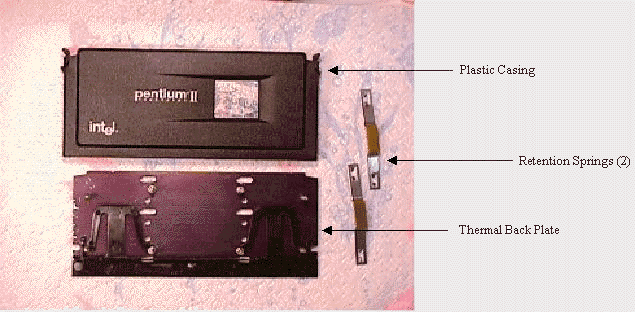
 

  • Lay the CPU down with the thermal plate facing you. You should see 8 steel pins. The pins on the outside are the pins that hold the plastic case to the CPU cartridge.

  •  
  • Now grab the cartridge and look at the upper corner. You should see the thermal plate and the plastic casing come together.

  •  
  • Take a small or medium flat blade screwdriver, and put it between the casing and the thermal plate. Now turn the screwdriver 90 degrees. While turning the screwdriver, you should here it click or pop when released.

  •  
  • Repeat step 3 on the other top corner.

  •  
  • The bottom of the cartridge is tougher than the top, and requires more work to remove it. Also note, that you MUST be careful not to damage the PCB (printed circuit board) with the screwdriver.
  • Once the first half of the casing is off, flip the cartridge over to view the tag ram chip and L2 cache chips.

  •  
  • Once the first half of the casing is off, then the next step requires removal of two spring fasteners. A small pointed object works great, such as a jewelers screwdriver. Simply bend the catches up slightly to release the spring.

  •  
  • After the spring fasteners are removed, lift the PCB from the 4 pins. You should be able to see the CPU and L2 cache ships on the other side.

  • Next =>