
|

Back in September of 1998 when I discovered that my Celeron slug was less than perfectly flat and decided to try to straighten it out by sanding it, I took a lot of less than complimentary comments throughout the newsgroups and bulletin boards. However, the process worked and these days it would seem that there is a wider acceptance of this method of helping the chip to stay a bit cooler. One thing I have received a lot of comments and questions on has been how hard it is to keep the slug parallel to the sandpaper while removing material from the slug's top. My answer, until recently, has been to go slow and be careful not to rock the SEPP as you sand. This, of course, is easier said than done. I don't care how slowly or how carefully you sand, the edges of the slug tend to wear down first. This is not a horrendous problem, but the flatter you can get the slug, the more surface there is to be placed in contact with the heat sink or peltier. The more surface area, the more heat that can removed from the processor.
I finally got my second (yeah, only my
second) Celeron. This time it's a week 21 Puerto Rico 366 slot one. I figured
I'd take my time getting this one ready for some heavy duty cooling. I
held the slug against a machinists straight-edge and held the two up to
the light to see how far this one was out from being flat. Bad! This one
had a big enough dip in the center to only allow contact with the edges of
the slug on the heat sink. I'd either need a couple of tubes of thermal
paste to fill this pot-hole or I'd need to flatten this thing out.
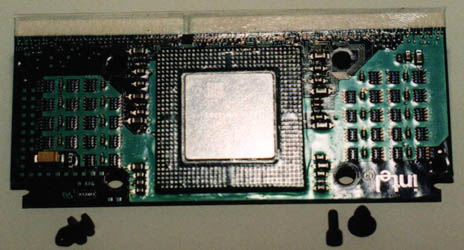
showing on the slug - for now... Those black things are the anchors. |
I started thinking about the long process
of lapping the slug and how the edges wore down unevenly and decided to
try to build a simple jig to help keep the Celeron true against the sandpaper.
Everything that I came up with involved building a jig to some pretty demanding
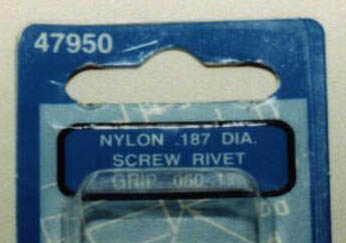
specifications. There had to be an easier way. There was. It involves about
$3 worth of fasteners from the local home center in addition to your various
grades of finishing paper and a very flat surface.
4-40 aluminum cap screws to replace the nylon screws did the trick. |
The idea was to support the SEPP farther
from the center of the card where the slug sits. To support the slug, you
add some adjustable legs. Making these supports adjustable allows you to
position the slug perfectly (well, close enough) flat before you start
to sand. As you sand, the adjusters wear down as the slug wears down. This
keeps everything parallel as you work. What makes this trick work well
are the neat little nylon panel anchors I found at the home center. The
0.187" diameter nylon anchors fit tightly in the mounting holes on the
Celeron SEPP. If you replace the nylon screws with aluminum ones, you now
have a way to level the SEPP for lapping.
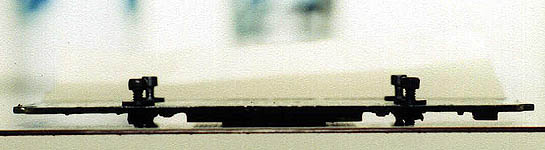
touch the glass. Once adjusted, coat the slug with a little thermal compound and check for a good contact pattern. Now it's time to start sanding. |
I was looking for the best finish I could
get and knew that there was plenty of thickness to the metal of the slug,
so I started out with 220 grit wet and dry automotive body paper by 3M.
This was taped to a piece of double thick window glass and placed on a
flat formica counter. I wet-sanded in a figure 8 pattern until there
was no longer a visible dip in the center of the slug. I then switched
to 400 grit to get rid of the scratches left by the 220 paper. I then moved
to wet-sanding with 600 grit, then 1000 grit, and finally with 1200 grit.
After getting the scratches out by wet-sanding with the 1200 paper, I switched
to a new piece of 1200 and sanded dry. Wet sanding with a constant supply
of fresh water will take away material quickly without leaving too many
scratches caused by the build-up of the removed metal on the sandpaper.
Wet sanding leaves a dull finish. Dry sanding, especially with the very
fine grits, builds up material on the sandpaper which can scratch the finish
- but can also burnish the metal and produce a mirror finish. This is what
I was after.

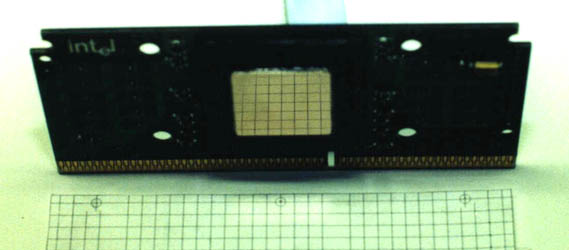
whole top of the slug showed copper. This slug was much more warped than my first Celeron. The arrows show the ends of the cap screws which wear down with the slug. |
By using the 4 points of the cap screws
as guides, you reduce the margin of error about four-fold. After
finishing the lapping and polishing, I put the slug up to the straight-edge
again. There was still a very small gap between the straight-edge
and the slug at all four corners, but the amount of the gap was much less
than the results I achieved on the first Celeron I lapped. All and
all, I have to say that this was one of the better $3 I've spent on my
system. If you're going to lap your slug, give it a try. I
think you'll be pleased with the results.
|