
|

The working concept for this cooler was
going to be one of simplicity. I was looking for the simplest way
to build an effective water cooler that would keep the "stressed" temperature
at an "acceptable" level, while making sure that there was no condensation
build-up. I decided to try an all aluminum cooler and cold plate
for this version.
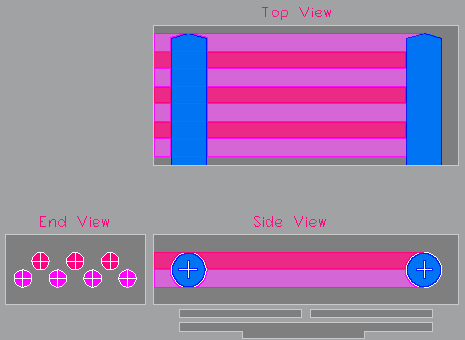 |
I started with a 2" x 1" x 5" block of
aluminum and drilled seven holes in the end for water passages. These
would end up being capped with set-screws. Two larger holes were
drilled in the side of the block for the water inlet and outlet.
These would receive brass nipples to attach the water lines. Between
the water cooler and the processor I would attach 2 - 30 X 30 mm peltiers
and a cold plate.
 |
The only difficulty faced in drilling the holes was keeping the holes parallel to each other and to the sides of the block. A good vice and a true drill press table help make this less of a concern. With the holes drilled, the last 1/4" of each hole had threads tapped into it to allow the set-screws and nipples to be threaded into place.
Once the drilling and tapping had been
completed, all six sides of the block were cleaned up and the upper and
lower sides were lapped. The upper was lapped for cosmetic reasons,
while the lower needed to be as flat as possible to allow good contact
between the cooler and the peltiers.
 |
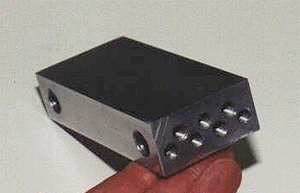
This shot shows the setscrews and brass nipples in place. The nipples were sealed using plumbers teflon tape. The set-screws were sealed with automotive silicone sealer. To make sure that the cooler was leak free, I made a test rig with some hoses and filled it with water. I then added 50 pounds of air pressure into the unit and left it to sit overnight with a pressure gauge attached. Fifteen hours later and the gauge still reading 50 pounds, I declared the unit pressure-tight.
The blue block beneath the cooler is some
of the Dow R3 insulation I picked up from the local home improvement center.
More on this later.
 |
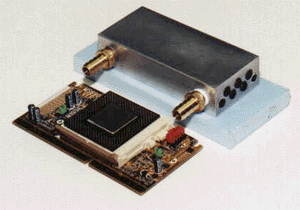
This shot shows the cold plate machined and temporarily attached in place. The plate was machined from a sheet of 1/4" thick aluminum. The dimensions are 40 mm by 66 mm. This is just big enough to cover 2 - 30 mm TECs and allow for some attachment holes and a bit of overhang on the ends. Holes were drilled and tapped into the cooler to allow threads to be tapped to hold the 1/2" by 4-40 nylon screws in place.
Machining the cold plate is about the only
thing on this cooler that would be a bit tough for most people to do in
the home workshop. The reason for the "raised" area where the cold
plate meets the processor's slug is to allow as much of the cold plate
as possible to be insulated from the air inside the case. Hopefully
this would keep the possibility of condensation to a minimum.
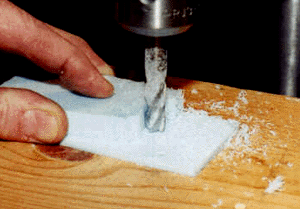 |
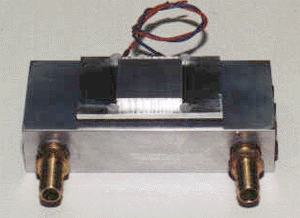
To get the insulation that goes around the TECs and between the cooler and the cold plate the right thickness, I "machined" it free-hand using an end mill inserted into the drill press. I then cut out the area for the TECs with a razor knife.
The insulation, as I mentioned, is Dow R3 closed-cell styrofoam insulation. It is generally used as an insulator when installing aluminum or vinyl siding on homes. The insulation comes in 4 foot by 8 foot sheets from the local home center for around $7 per sheet. You'll find it listed as 1/2" Dow R3 Styrofoam - Skew # 2--5700-09016--0.