
 |
The Sink
My first impression of this sink after
opening the box was that this was the first commercially available sink
that I have seen that I would categorize as "massive." Just calling
it big is an understatement. It's just a little smaller than my Big
Sink, and that's big!.
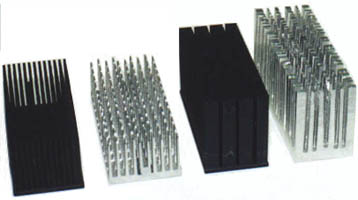
Left to right: Alpha P521, Cheap Sandwich, Alpha P125, & Big Sink.
Overall, it is well made and comes with first quality hardware. My only gripes are that the machined surface of the base has a depression in the center and is not as smooth as it could be. Also, the assembly instructions were in Japanese. The base was easy enough to finish by lapping it with progressively finer grades of wet / dry sandpaper - ending with 1000 grit. As for the instructions, well, it was meant for sale in Japan....
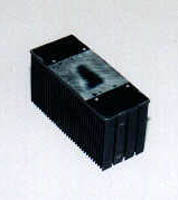
Half way through the lapping and there
is still a depression in the center of the sink.
Installation
The sink is available in a few different
configurations. Mine came with a shroud for mounting two 60X25mm
fans perpendicular to the Celeron. Other options would appear to
be available.
 |
At this point, you will realize how big this set up is. Installed on the motherboard, this package stands a full 4 inches from the motherboard to the tip of the fan retaining screws. This sink will not fit in an InWin A500 case using either an Abit BH6 or BX6r2 unless you find another place for the power supply. Doing a little measuring and guessing, the P126M60 should fit this combination if you don't use the first 2 RAM slots closest to the processor. A small price to pay for cool, right? ;-)
Using a full tower case, such as my InWin Q500A, there is no space problem for the P125.
The next challenge is attaching it securely to the motherboard. The standard Abit processor end holders for the Celeron are not designed to hold a sink that comes flush with the ends of the SEPP. A little creative work with a Dremel tool or a file will remedy this situation. The BH6-PII mounts worked better, requiring only a small rectangular shim to help hold the SEPP and sink in place and at a right angle to the motherboard. I didn't spend a lot of time on this, as I was planning on mounting my sandwiched TEC between the SEPP and sink. With the TEC and rear heat sink, the standard BH6 PII mounts work well.
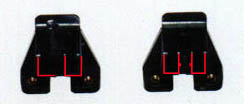
The missing red lines show the material that needed to be
removed from the holder to allow the SEPP to stand straight
using the BH6 Celeron mounts.
Performance
This sink is the best non TEC sink I have
tested. This includes the Big Sink. These tests were performed
with the twin 60mm fans blowing toward the heat sink.
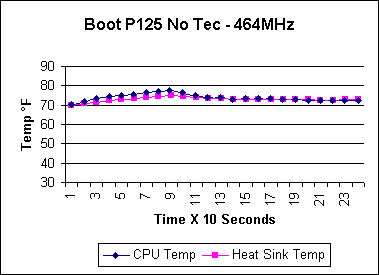
From a cold boot at a room temperature of 70°F, the slug temperature
rises only 8°F before Windows
boots and Rain starts running (at 95 seconds). While I am not
able to monitor the thermal diode during the
boot, I would guess the temperature to be about 15°F higher than
the slug temp before Rain kicks in.
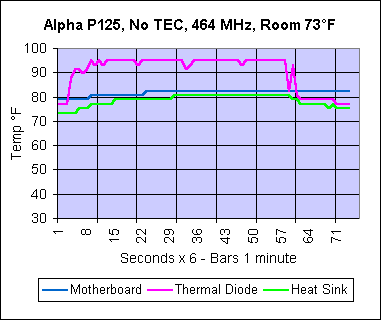
The Quake2 Test was run immediately after the boot test. I enabled
logging in Motherboard Monitor 4.04 and started Q2. I allowed
both
introduction maps to run twice and exited back to windows.
In previous heat sink testing, I have concerned myself with heat sink and slug temperature, because that was all I could measure. Being able to monitor the thermal diode in the processor has given me a new view on what temps are actually reached. During this test, the highest slug temperature I saw was 82°F. Compare this with the 95°F shown on the chart. That's a fair amount of difference. It is also interesting how much time it takes for the heat sink to reflect the temperature of the processor. Because of the relatively low mass of the base on this sink, it responds quite quickly to changes in the core temp.
You'll notice that the motherboard temperature is higher than that of the sink. This is not a misprint or a problem with Motherboard Monitor. The temperature that MBM displays is right on with what the BIOS displays. This temperature seems to have no direct comparison to any temperature I have measured anywhere inside the case. Instead, it seems to run between 1 or 2 degrees high, to as much as 5 degrees high. I have tried placing a thermocouple right above the Winbond W83782D chip and get a much lower reading. I also get a lower reading measuring the motherboard next to the Winbond chip. The surface temperature of the Winbond chip shows a bit lower than the displayed temp. I must conclude that the reading given by this sensor includes the internal temperature of the Winbond chip itself. It may well give some useable information, but I don't find it useful for anything but comparing what I see posted for it in the newsgroups and bulletin boards. I will also assume that the voltage the chip is running at has a direct effect on the temperature it displays, though I haven't taken the time to test this theory.
So, is the P125 a great sink? The answer is yes. Will this sink allow my stubborn Celeron 300A (a SL2WM 98330740 Malay, for those who asked) to run without locking up at 504 MHz? Unfortunately, no. My Celeron will not run at 500 reliably with out the additional cooling offered by a TEC. However, if you are lucky enough to have a Celeron A that just needs a bit better cooling to do the 500 dance, or just want a great sink, this is the heat sink for you.
Now that I have the stock testing out of the way, it's time to move on to the reason I bought this sink.
|
|
|
|