
|

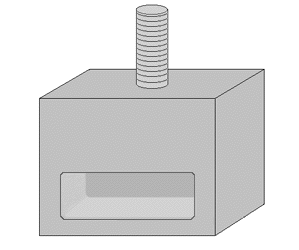
After searching the web for pictures of socket 7 and 370 heat sinks so I could look at the mounting assemblies, I came to the conclusion that they were all about the same - a stamped spring steel clip - except a pretty trick looking one at Swiftech on their MC370. The only thing I didn't like on the Swiftech design was that it wasn't spring loaded. This is a "must" as far as I'm concerned, as I think it's important to allow for thermal expansion and shifting. I'd also be concerned that I either wasn't getting it attached tightly enough, or I would get it too tight and break the mounting tab on the socket. Without the mounting tabs, you're up a creek.
With these thoughts in mind, I came up
with the following design.
 |
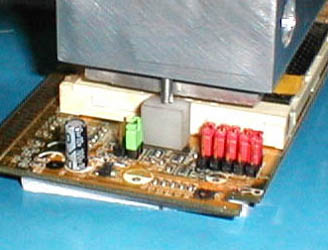
The mounting block was cut from some 1/4"
nylon I happened to have from another project. I cut a slot in one
side for the tab to fit into. Though the drawing doesn't show it,
the bottom of the slot is higher on the front of the slot than the back.
This forces the block against the socket as the block is pulled tighter.
A hole was drilled in the top of the block and tapped for some 4-40 all-thread
rod. Since I wasn't sure of what the overall length of the rod should
be, I just left it long.
 |
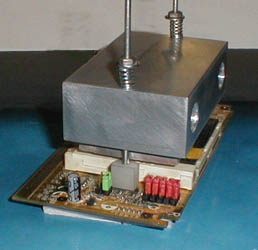 |
I now had a way to mount the cooler firmly to the socket. The springs allow for the tension on each side to be adjusted independently. There is a certain amount of guess-work involved in getting the tension just right, but it's not that difficult. With the mounting hardware completed, it was time for final assembly.
As you may have noticed in my previous
projects, I have this thing for enclosing Celerons in foam insulation to
"keep the cold in." The slot one version I did in Water
Cooler 2 hid the circuit card completely. This has been
done to try and keep air from hitting any of the cold parts. While
the foam worked pretty well by itself, I was looking for a way to make
it as air-tight as possible. I had considered a number of ways to
do this and had made some mock-ups of a couple - including using a Tupperware
container to house the Celeron.
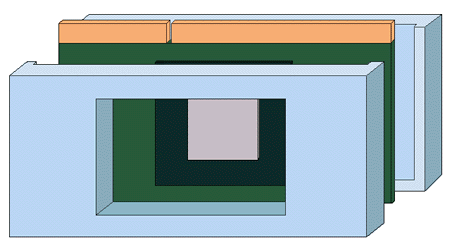 |
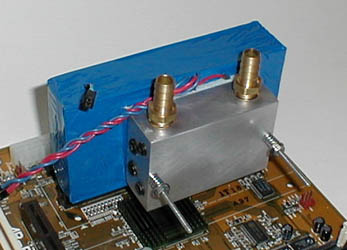
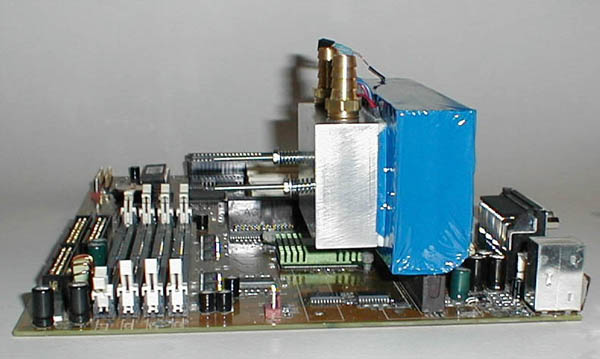
As it turned out, the Tupperware was better suited to sealing food than processors. Back to the 1/2" Dow R3 foam. I cut two blocks large enough to leave a quarter inch boarder around the slotket adapter. On what would be the front piece, I cut a rectangular hole that the cooler would fit into. I "machined" the foam so the adapter would fit tightly between the two halves and sealed the two halves together with some double-sided waterproof tape.
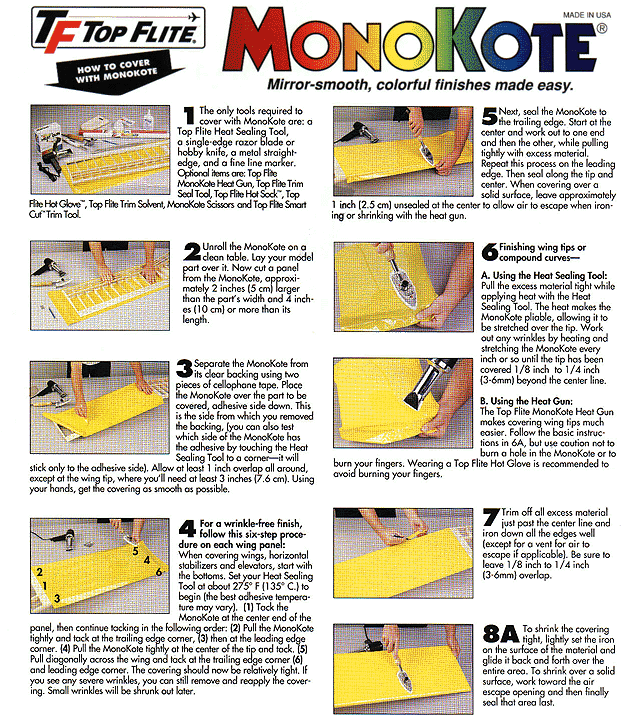
With the adapter in a clam shell of foam, I needed a way to better seal it from air infiltration. I needed a cover of some sort. I happened to be looking through a radio control catalog and came across some MonoKote. MonoKote is a brand name for a thin Mylar-like material use by hobbyists for covering the wings of model airplanes. I got mine from the local hobby shop. It also can be ordered online from Tower Hobbies. They also sell their own brand which should work as well and is a little cheaper in price. It is adhesive backed and adheres tightly to your foam. You then use a heat gun or a clothes iron to shrink it tight. Sounds pretty easy, right? Not! There is a learning curve for using this stuff.
I'll spare you the details and unfortunately, or fortunately (considering the less than spectacular outcome) I didn't take pictures of the process. However, you can see by the wrinkled film in the picture below that if it were a plane, it wouldn't fly. Anyway, if you want to see how the process should go, these are the instructions that come with the roll of MonoKote. This gif is 213 k, so give it a chance to load.
Covering the foam with film is similar
to doing a nice job wrapping a birthday present. Easier once you
know the tricks. I have no doubt that my next attempt will look a
little better.
 |
 |
I'm still a bit paranoid about condensation.
Not only did I put dielectric grease in the slot 1 socket, but I also put
another coat in the 370 socket. Since I posted that I had blown a
motherboard due to the effects of condensation, I have received a number
of email from others who have either blown boards or processors due to
condensation shorting out parts. This is not a matter to be taken
lightly. If the processor is getting cold, so is the socket and board.
Protect it with whatever means you can.
|
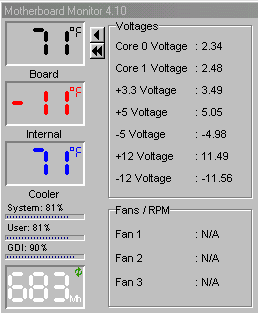
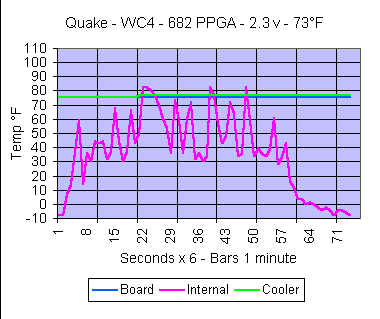
Performance is pretty darn good.
Hooked up to the radiator and pump, temperatures
were even lower than with WC3. This is likely due to the insulation
surrounding the adapter card, which "keeps the cold in." After an
initial test using some ice cubes in the reservoir and hitting 682, I backed
down to 632 MHz - which, at a front side bus speed of 115, was about as
fast as my PC100 RAM will go. I ran at 632 for about six weeks
without a single problem. While writing this article, I decided that
I needed a Quake2 test for comparison with the other coolers. I decided
to see how it would do at 682 again. I cranked the voltage up to
2.3, disabled the L2 cache, set the bus to 124 with the divider set to
give 41.3 MHz and totally forgot to add ice to the reservoir. Funny thing,
it booted and ran Q2 demos without a problem. Cool too. Now
if I could just find some decent PC133 RAM at a price that doesn't make
me want to run the other direction, I'd be set for another few weeks - until
the "need for speed" hits me again. I have to admit that the thought
of an Athlon running a gigahertz has my interest!
 |
 |
 |
I think that this is the first cooler project I have
finished where I have not wanted to immediately start another one to fix problems or
go for more speed. I have finally come up with a cooler that does what I want
it to do. While WC2 tops the list for heat removal, WC3 and WC4 win hands down
for simplicity of design. This is an important consideration if you're looking
to build a water cooler that you don't *have* to mess with to keep it cooling properly.
|
|
|
|