
|
What's New Archives - 1999
|
|
To close the old year out and open the new one, I have a new page up on the most recent addition to my arsenal of test gear. I finally gotten around to building a heat sink tester. I've only been thinking about this for a year, so that's pretty timely for me. With the tester done, I can move on to working on the new cooler for my server and actually have an idea if it will work before I install it. Now that's progress!
Here's wishing you all cool, fast processors and a great coming year.
|
|
I'm getting set to start on a new cooler for my home LAN server. The server is a K6 box with no temperature monitoring. Of course this meant I needed a way to monitor the temps. A Radio Shack thermometer comes to the rescue again. I've modified this one to read both temperature scales remotely. You can take a look at how I did it here.
This cooler is going to be a bit of a departure from the last few high performance coolers. The goal for this one is to make it noiseless. No fans. It also needs to be able to run 24/7 without maintenance. And since it has to cool a "high heat" K6, it needs to perform well. This is a tall order for any heat sink. This should be fun!
|
|
Seeing that I definitely needed some help with the MonoKote on the Water Cooler 4 project, John from Unlimited Hardware.Com sent me over some much needed suggestions on playing with MonoKote. I could have used this before I started!
"I have been building and flying R/C airplanes for about 15 years and I am very familiar with "Mistake-Kote"
I mean "MonoKote". The Tower brand has some advantages over the MonoKote because the Tower brand is a "low temp"
covering. It does not need as much heat to activate the adhesive and shrink and it is specifically designed
for foam applications.
I have found when using shrink covering that it is best to use the iron to attach one edge of the covering first.
Gently pull it tight then iron down the opposite edge pulling most of the wrinkles from it before you iron it
down. VERY IMPORTANT: do not iron it down on the entire surface, only at the edges. This will allow you to shrink
all the wrinkles out with a heatgun.
It is not necessary to iron the covering to the entire surface unless the surface is convex this is an unfortunate
mistake often made with shrink coverings that results in a poor wrinkled finish on airplanes."
I fall into the last category. I ironed that sucker every which way but right. Oh well, live and learn. Thanks to John, maybe you won't make the same mistake.
|
|
Just in time time for turkey day, I have latest project from the Benchtest Workshop. The Water Cooler 4 article is up. While taking a Celeron 366 to 682 sets no speed records, it is certainly a nice bit of a performance boost for this chip. I hope the method for attaching the cooler to the 370 socket gives you heat sink builders some ideas to improve upon.
Have a great day with family and friends.
|
|
|
|
For those of you who haven't gotten their feet wet with Linux, just do it. More fun than I've had in a long time (and more work, too!) I haven't done so much reading since cramming for MCSE. Hopefully by the end of the weekend, I'll have the kernel re-compiled one more time and the software bridge in place so I can see the computers on both subnets. I have it set up now, but there is way too much enabled in the kernel and there are files all over the place from experimenting with this and that. At this point in my learning, it's easier to wipe the drive and reinstall, than it is to clean house. When this is done, I'll take a break from the reading and get a couple of long overdue articles out.
See you soon...
So, after a couple of nights at 632 with
NO condensation, (even though there was 98% relative humidity at 75°F)
I decided to see what this chip would do. Since the RAM won't run
at over 117, I disabled it. 120 MHz, no problems. 124 MHz was
a bit of a push. This seems to be about the maximum this little Celeron
366 wants to do - and this required a few ice cubes in the reservoir.
But the site of this chip running Sandra at 682 MHz was worth the price
of admission! I won't be running at this speed - even when RAM prices
hopefully drop, but 660 MHz looks like it could be a nice safe place to
play.
|
|
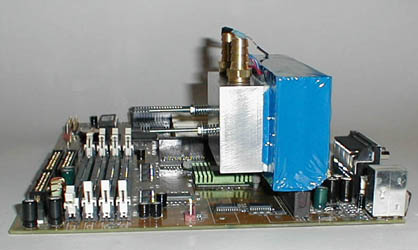
BTW, the weird looking blue stuff is Monocote. I am no pro at covering styrofoam with this stuff, and it shows in the wrinkles, but it is air-tight and with an inch of foam insulation inside, has eliminated the condensation problems..... I think.... At least the slot one socket doesn't get too cold - though it is still filled with dielectric grease - just in case.
|
|
On the PPGA front, the 366 is still humming along at 632 MHz as I look for better RAM that I won't have to hock the house to buy. I just hope that the prices come down before PC133 becomes obsolete.
I finally broke down and purchased a digital camera. Starting with the half-way point in the upcoming Water Cooler 3 (PPGA) project, the quality of my photographs ought to become a little more consistent. Of course, this is just after I figured out that the add-on light meter for the flash was what was causing the problems. Oh well, at least I'll now be able to just keep taking pictures until they're right - instead of having to wait for them to be developed.
|
|
|
|
|
|
|
|
Jim's looking at PPGA stuff? Yep. And I guess that you know what that means. It's time for me to move on from my slot one adventures and join the rest of the world with overclocking a PPGA. Hopefully I won't trash a motherboard in the process this time.
The chart was taken from Intel's Plastic Pin Grid Array packaging manual - chapter 13 ~ available here. |
|
|
I have to have the worst luck with getting quick running Celerons. The 366 - slot one seems to be stuck at 567 MHz. I can't even get this one to beep at 578. It was suggested to me yesterday that I give up on the slot ones and try a PPGA. - I'm thinking on it. - It seems a shame to waste a cooling setup that will run -25°F on a chip that won't cooperate.
|
|
I'm still getting used to this Asus board. It has a different feel to it than the Abit. It's still too early to talk about it's stability, but it has a strange habit of returning to the default processor speed if the boot process is interrupted. This may be a setting that I have overlooked, but I don't see any mention of it in the manual.
If you run a PPGA processor, there's a good, new
review of four of the best heat sinks
for the overclocker over at John Bogush's Unlimited Hardware.Com. John has spent
a lot of time making sure that the comparison was accurate and fair. The results of the test may surprise you. John thinks
there's a new king of the hill. From his results, I'd agree with him.
I got out my recently purchased tube of Permatex dielectric grease and filled the slot 1 socket up with this stuff. All
the while, I'm thinking how I just blew a board and how I wouldn't be a happy camper if I did it again. I put the
processor back in with dielectric grease oozing out the top of the socket. I wiped the excess off and checked to see that
I now had an air-tight seal around the bottom of the insulated Celeron and the socket. An inspection mirror comes in handy
for this. I checked to make sure that everything was tight and fired it up. More anxious moments, then that beep. Then
Windows. That was 4 hours ago. My re-insulated water cooler is dry. The insulated slot 1 socket is dry. I pulled the
Celeron back out. No Ice. No water. Just dielectric grease, very cold dielectric grease. I've cleaned it all up and added
more grease and reinstalled it. So far, so good. The worst is behind me. I have no idea how this will work out over the
long run, but it looks promising. I'm going to continue to run at 550 and 2.2 volts for a few days to break in the chip a
bit more and then we'll see what I can get it up to. Right now, loops of Quake 2 demo1.dm2 will push the temperature up to
about +20°F.
I had planned to have the first of the water cooler articles up by now, but the site got mentioned on ZDTV's Screen Savers
cable TV program. (Thanks to Leo Laporte for the plug!) I got 2 days worth of hits in an hour. Along with the added
traffic comes added mail. Between working on the P3B-F and answering mail, I haven't quite finished up the article yet.
Hopefully in the next few days.
I think this means that over the weekend I'll be applying some polyurethane to a motherboard and digging through my
automotive stuff for some dielectric grease to go between the edge connector and socket. I'm not positive that this
is the best approach, but dielectric grease works well for boat electronics and off-road vehicles....
I have to say that I'm pretty pleased with the Asus so far. It took only about an hour to swap out the BH6, which was
serving back up duty, and toss in the P3B-F. The new Award BIOS is a little different interface than I'm used to with
the Abits, but real easy to set up. Asus's new No-Jumper jumperless settings are as easy, if not easier, than Soft-Menu 2.
I downloaded Motherboard Monitor 10 from Alex's site and
with the thermistor off of the BX6r2, was reading board temperature, diode temperature and heat sink temp again. I
found that in the few days that I had to go back to the BH6, I hated not being able to read the diode temp. And, I didn't
even have to do any soldering to get the diode to work!
Well, back to tweakin'.
A while back, after getting my Celeron 366, I was again in the situation of needing to lap a very warped Celeron
slug. If you've lapped your slug, you know how hard it is to keep from sanding the corners down farther than the
rest of the slug. After a little thinking and three bucks, I've come up with something that makes the job a bit
easier. Interested? Take a look at Lap that Slug.
I'm in the process of writing the first article on my attempts with water coolers. Give me a couple days and
you'll find out why once you start playing with these, you'll never go back to air cooled. (I'm now on my third watercooler!)
More to follow in the next few days.
For the moment, the scariest part is behind me. After a marathon weekend in the workshop,
where I cleaned and coated the P3B-F with polyurethane, sealed the bottom of the slot 1 socket with silicone sealer, and
said a couple of prayers to the motherboard deities, I plugged in the hopefully waterproof motherboard. After a couple
of anxious moments, I heard that beep that says, "I'm alive." I swapped out the Celeron 300A for the 366 with its dual
40 mm peltiers and water cooler, and was able to get into Windows at 550 MHz. Idle temperature, -20°F. I shut down and
inspected the edge connector of the Celeron. Ice. Time for the next step.
Well, I'm up and running with my new motherboard tonight. An Asus P3B-F 6 PCI - 1 ISA.
This is quite a departure for me, as my last 3 boards have been Abits, but Abit's BE6 just wasn't what I wanted
and I had already had a BX6r2 (though a little worse for the wear right now). The board was not actually a planned
purchase, but one that was a result of a dual TEC watercooler that got a little colder and pulled a little more
moisture out of the air than I had bargained for. No visible condensation and there was enough insulation around
the cold plate and Celeron to keep the diode well into the sub-zero zone. However, I hadn't planned on moisture
build up INSIDE the slot 1 socket. A lot of moisture. Let's just say when the board died and I pulled out the
Cele, there was a wet edge connector and water all over the inside of the socket. Bummer.
Two nights in a row with something new to add. That has to be a record for me.
It's been a while since I've put anything resembling an update here,
but I have a couple of articles in the works and have finished one up tonight. If you've been
wondering what's been going on in the workshop for the past few months, take a look at the first
of a series of prototypes I've been working on.
Yeah, I'm probably dating myself, but as Colonel
John "Hannibal" Smith (George Peppard)( "A-Team"
NBC 1983-87) used to say, "I love it when a plan comes together."

|
|
|
|
I have a couple of new heat sinks on the
way and hope to get some new reviews up some time in the near future.
|
|
"I have been reading some of the articles on your website and have a little information I would like to pass on regarding electrical insulation of printed circuit boards.
You used polyurethane, which will work. However, the aircraft industry and the marine industry have been doing this sort of thing for years. We don't use polyurethane, as it can develop micro cracks as it ages (especially in elevated temperature or UV environments). We use silicone RTV.
Normally, this product is procured in ready-to-use fashion by the quart or larger quantities and it is expensive. However, you can make your own quite easily. Get a large tube of clear silicone adhesive and cut it with a solvent (Xylene, Methyl Ethyl Ketone, or Acetone) till it has the consistency of house paint or a little thicker. Then just dip the card in the stuff and let it dry overnight. It will last something like 600 years, is impervious to UV, will not break down from heat (under 300 degrees F), and is not affected by acids or salts.
DO NOT USE ANYTHING OTHER THAN CLEAR RTV!!! The colored stuff conducts electricity with white being the worst offender (full of titanium oxide). One thing about using tape to cover the contacts on the edges of the board. We have discovered that the simple act of pulling masking tape from a roll can and often does leave a static charge on the tape in excess of 6,000 volts. (You might want to stick the tape to the edge of your statically grounded work bench for a few minutes before you apply it to the board's contacts)."
Even though I happen to be fresh out of Xylene and Methyl Ethyl Ketone, ( ;-) ) I do have acetone (which is easily obtainable at paint supply and home centers). It does do a nice job of thinning the silicone and the dried mixture is flexible and looks like it will do the trick. Thanks for the tip.
Cue Cat
If you (like me) are a fan of Slashdot,
then this is ancient news. However, the proliferation of sites and
articles on the subject of the Cue Cat and Digital
Convergence's pathetic attempt to control a piece of hardware that
they have given away for free has become quite interesting. Aside
from the privacy issues that surround this device's intended use, the fact
is - it's a free toy that has some great uses. For those who haven't
heard of the device, it's a bar-code reader. When used with Digital
Convergence's software, it allows you to get more information on products
in specially bar-coded ads from Radio
Shack and other retailers. Unfortunately, it also "phones home"
so DC can compile a dossier of your purchasing interests.
To get up to speed on the subject, try the articles and links from this search of Slashdot and Michael Rothwell's great compilation of things Cue Cat at the FlyingButtMonkeys site.
To physically declaw the cat, try this link.
You gotta love this cat.
Thanks
Thanks for all of the nice e-mail concerning
my father. It's appreciated.
|
|
It's been a busy few months, with my job getting the primary focus of my "free" time. We are working on a web interface for a technical support database and I have been trying to learn as much as I can about the various aspects of ASP, MS SQL, and IIS - as well as some more javascript and Flash to try to make the site as usable and visually attractive as we can make it. I've built a new box to be able to run the database at home. (Heaven knows that no one would want me doing "trial and error" on the production machine!) I have taken a few shots of the assembly of the box and will try to get the story up some time soon. This box is no outrageous overclocker, but a nice cool machine none-the-less.
On a sad note, I lost my Dad on September 11. I'll miss him. His death really brought home the saying "tell your loved ones you love them often, as you never know...."
Lastly, I've been receiving a lot of mail that the links to Waterfall Pro and Rain don't work. You're right. Tim and Yihong Software have vanished from the web. I've e-mailed the personal addy I had for Tim without success, so I really can't tell you what happened or where you can mail checks to register Waterfall Pro. Rain and WFP are still available from a number of sites. SoftSeek for Rain, and Rocket Download for WFP - to name just two. If I come across some more information or if someone knows the story and can enlighten me, I'll pass it along.
I'll try to update soon.
|
|
I'll keep this short 'cause between work and home, I've been doing nothing but writing html. Time for a little fraggin' or something....
|
|
On the up-side, after 2 months of playing, I have figured out all of the troubles, bought a killer power supply, and found a peltier that rocks. With this new-found knowledge, and money spent, I have water cooler 8 up and running in its test configuration - and it kicks butt. I'll be building the final version of WC8 shortly.
On the "what's new" front, I was in the position of needing a new motherboard recently. It's time to upgrade one of our computers and I wanted a new toy anyway. With more processors than motherboards currently, I needed another board to take a PIII / Celeron2. I can honestly say that after looking at virtually every new board on the market, I'm unimpressed with the current offerings. The i815e chipset from Intel is a real letdown. You would think that Intel would take the performance up a notch from the trusty BX, but that doesn't appear to be the case. I even considered the i840 with full knowledge of the fact that buying RAM for it would mean eating baloney sandwiches for a month. However, for all the money one needs to spend to get an i840 board up and running, the performance doesn't justify the expenditure. The VIA chipsets are getting better, but VIA still has a way to go to before they'll be on even footing with Intel in the performance arena. I will say that the ability to run the SDRAM asynchronously faster than the front side bus frequency almost swayed me to the VIA chipset. If this feature was offered with the i815e, I would have been mighty tempted.
My wish list for a board included (in order of importance): the ability to read the internal diode temperature (after all, I do like playing with heat sinks!), *LOTS* of bus speeds to choose from, and ATA/66 support. On the "I want it, but can do without it" list were ATA/100, socket 370 (rather than use an adapter), and a "dual bios." Since all of these features were not available on one board, I ended up with an Abit BF6 and a Promise Ultra 66 to handle the hard disks. In an industry where components improve weekly, to end up buying last year's motherboard strikes me as a bit amusing. Anyway, the new board will allow me to swap the Asus P3-BF to my son's computer so he can give me a hand with some testing. Maybe now I'll be able to dig my way out of some pending projects.
|
|
To get myself back in "writing mode," I've put together a short piece on tearing down WC4 after seven months of constant use. I was curious to find out how well the cooler did at keeping moisture away from the critical components. I was pleasantly surprised by the outcome. You can take a look at the results here.
I have enough pictures of the whole process
of building WC7 to keep me busy explaining them for a while. I'll
try to tear myself away from the workshop long enough to get some of them
assembled into an article or two.
Until then....
|
|
So how does the 700 overclock? So far, not too well. Unlike other processors I have played with, this one does not seem to like much more than stock voltage and dropping the temperature the usual amount doesn't seem to make a lot of difference in speed. With the box stock Intel heat sink, it will clock to 840 at 1.6, 1.65, and 1.7 volts. The top internal temperatures while pushing the heck out of it remain below 117°F. If I drop the temperature with a pair of peltiers and a water cooler so that the idle temps with Rain are in the -7° range (20s without Rain) and 868 MHz is attainable (and stable - if one can tell that with only 2 days of pushing it.) High temps internally now run in the 60s. So far pushing the chip to a 133 bus for a total of 933 has not been possible. For some reason, I get worse results with the voltage set to 1.7 or higher. In fact, it seems to like 1.6 better than 1.65. It seems like I have gotten another weird chip. If I have to stay at 868, so be it. This setup is quite quick at its present speed. However, the next step for this chip is lower temps. I'm thinking along the lines of -20 at idle without Rain. This has meant some re-thinking of the radiator setup I was planning on. Did anyone else notice the "dorm sized" fridge at K-Mart (Oh Martha, I'm sorry, make that the NEW Big K) for $79 this last weekend? Looks like a good source for an inexpensive refrigerant pump....
Elsewhere:
For the cooling fanatics in the crowd,
you have to check out this thread
over at SysOpt's BBS.
The pictures are here.
This gentleman has remover the slug from his K6 and then cooled the core
with water. Now that's something you don't see every day! Thanks
to Paul for the links.
|
|
Speaking of tinkering, I've been thinking about running multiple water coolers off of a single radiator. Things are getting a little too crowded under my desk to stick another single box with radiator, pump and fans down there. I've also been toying with the idea of using ducting to direct the hot air from the radiator's output outside the room. I'll have to see if I can come up with a design that works and doesn't look like it belongs in the basement.
|
|
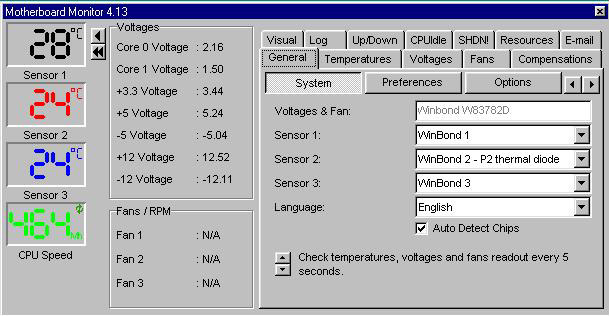
I finally have a nice temperature monitoring system set up on the Linux box. This gave me a chance to try something that I had been wondering about for a while. As you know, the CPU cooler programs use a HLT call to suspend the processor while it is idle. This results in less power consumption and a cooler processor while idle. UNIX and its variants have this call built into the operating system. I was curious if one were to switch nothing more than the operating system on a box, would the idle temperatures be similar?
To find out, I did fresh installation of
Red Hat 6.1 on one hard disk drive and a fresh installation of Win98 SE
with Rain on another. I booted up Win98 first and let it sit for
15 minutes to let the temperature reach its lowest point and took a "snapshot"
of the temperature using Motherboard
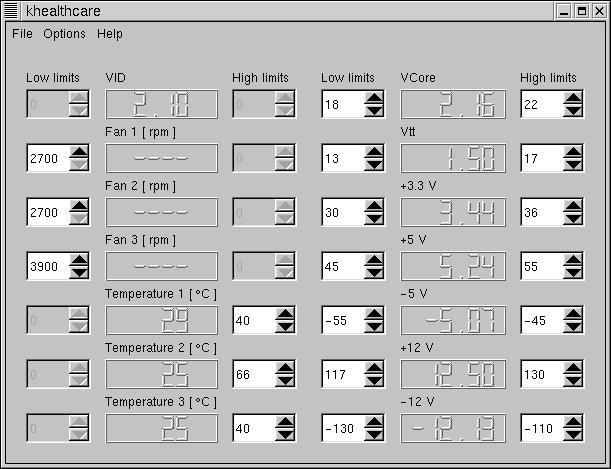
Monitor 4.13. I then shut down, swapped hard drives and booted
up Linux, let it cool for 15 minutes and took its temperature with a Lm_sensors
front end called KHealthCare.
|
|
As you can see, aside from the fact that the room temperature went up 1°C during the time I transferred disks, the temps are about the same. This is no earth shattering news - just something I was curious about. One other little item of interest to the overclocker is that Linux issues the HLT about half way through the boot-up process, where to get Rain running in Windows you need to complete the whole boot.
If you noticed that the 12 volt reading looks a little high, I've noticed that too. I'll have to keep an eye on that.
|
|
The next step is to plot the temperatures of this box with the Alpha P125 the Cele is wearing for a few days before I move to a water cooler. Since the 300A at 464 has had its temperatures well documented in a Windows box, I'm curious to see the differences in temps running Linux. It should make for an interesting week.
My apologies for the fact that this page has been "locking up" lately. It would seem despite claims that their new affiliation would help speed up the program's loading - my counter, the counter, has been a "no counter," and not loading. So much for progress. It looks like it's time to do some work in the cgi-bin and cut loose with this program.
|
|
I am a little late with this, but my requests to Abit for a new CMOS chip were answered the day following my BIOS flashing episode. A pretty quick response, but I'm glad I didn't wait. I had been through the search engines and Deja forward and backward looking for better information than is listed on Abit's site regarding the cost and how to get a new chip. Here is the info I received from Abit.
"The price for the bios chip is $10.50, in order to buy it, you can send us a check along with your request to 46808 Lakeview Blvd, Fremont, CA 94538 Please include your shipping address along with your request to us, and please make sure you put down your model number and the reversion number as well.
Best Regards,
Terry
Terry@abit-usa.com"
I hope you don't need this info, but if you do, this might save you a little time.
I haven't been in the loop on the software cooler programs lately and totally missed the introduction of CPUidle Pro. This version will work with Win2K and NT if you find yourself having trouble with the ACPI calls or are running dual processors. You can check it out at Andi's site. I guess this means that sooner or later I am going to need to update the tests.
From time to time, I get the opportunity to look at some great pictures of water cooled systems. In honor of New Zealand retaining the America's Cup, here are a couple of Kiwi sites with some nice water cooled rigs. Orthello's and Subside Overclocking. Garrie has one nice looking setup.
|
|
Many thanks go out to all of you who offered your help today. I received everything from good advise to an offer to flash me a chip on his board. (Thanks Sterling!) All of the email was appreciated and made the "little victory" all the better.
|
|
Lately, I have had so many projects going on at the same time that it has been difficult to focus on one thing at a time. I have come to the conclusion that it is probable that I did not burn up the Abit BX6r2. After some reading on the DMI Pool Data, I think I have just corrupted the information on the CMOS chip. I will give Abit a call tomorrow and have them ship me a replacement chip and see what happens. I was thinking of "hot flashing" the BIOS, but haven't been able to come up with a chip to put in to get the board up. I'll try the hot flash when I get the new chip from Abit.
On the "new technology" front, I just got sent an interesting link from Justin that there is a new peltier device in the works that is supposed to be able to get a Delta T of 200° Kelvin. This would be quite an interesting advancement from the present peltiers, though I seem to have enough trouble insulating setups with a temperature difference of 60°K. You can take a look at the article over at EE Times.
|
|
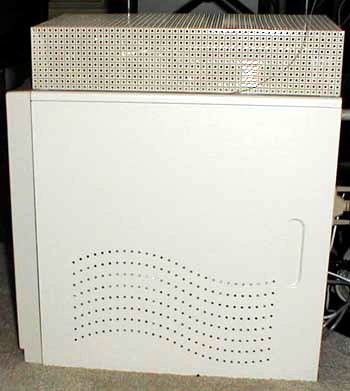
This is a self-contained, water cooled unit with thermostatically controlled, variable-speed radiator fans. It does a pretty good job of cooling the old AMD K6-233 toaster, keeping the back side of the processor to about 90°F while pushing looped timedemos of Quake 2 in X-Windows in a 70°F room. Frame rates? Don't ask. It was also running Apache, Sendmail, and serving files at the same time. Can we spell s-l-o-w....
I'm about half way through the write-up on
the project. With any luck, it should be up in a couple days.
|
Ramblings: Over the last few months, I have received a lot of mail with questions about building the ultimate water block / peltier setup. "What about building a block to handle six 72 watt peltiers and get the CPU temp to minus whatever..." My thoughts on the subject, at this point, are:
WC4, which is being run with 2 - 30 mm peltiers, typically cools the processor's internal thermistor to 15°F to 20°F at idle without a software cooler (Rain). With Rain, those temps are -7° to -12°F. Without any additional cooling of the water for the block, the system will boot a Celeron 366 into Windows 98 SE at 683. It is certainly not stable at this speed, but does boot and run some light applications. So what happens if I chill the water to get the internal processor temperature in the -40°F range? Same thing. It still boots into Windows - and is still too unstable to run as anything other than to boast "see what speed I got!" Does getting the processor down to -40 help me to boot into Windows at the next setting on the P3B-F (133 MHz)? No. Unfortunately, doubling the rated speed of ANY of my processors has not been possible. Now, this might be the luck of the draw - with me as the unlucky one - but I have not seen many success stories of people doubling their processor's rated speed. There IS a physical limitation to the amount you can overclock a given processor - frozen or not.
For me, the bottom line becomes "why cool the chip more than I need to?" If you've followed my water cooling projects, you know that condensation is a real concern and the colder you get the processor, the colder the components around the processor get. This means that there is a greater potential for condensation. If I am not going to gain speed or stability from going colder, then why increase the chances of condensation?
|
|

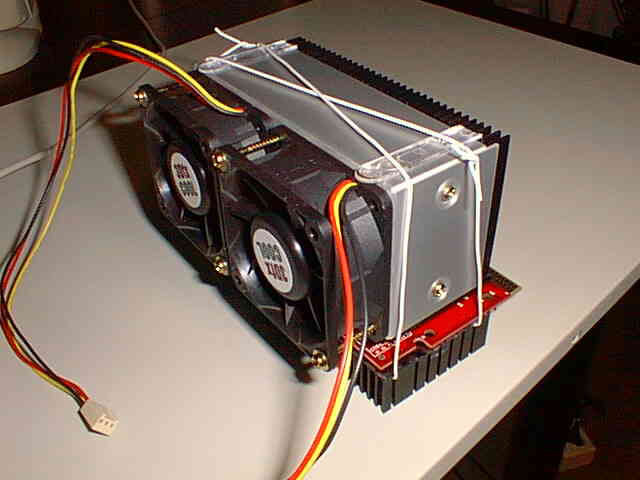
(click to enlarge) |
As one of the goals of this project was to reduce the noise produced by the multiple fans cooling the server case, I wanted to be able to throttle back the big 120 mm Panaflow fans that Ian at 2CoolTek is sending over. I found a couple simple circuits using an op amp, mosfet, and thermistor that I combined to produce a variable voltage to the fans based on temperature. With the sensor attached to the radiator, the two test fans were running at about 7 volts at 65°F. At 88°F they're full voltage. As the workshop is a bit on the chilly side, I'll have to wait until I assemble the cooler setup on the server to find out if further tweaking will be necessary.
|
|
To close the old year out and open the new one, I have a new page up on the most recent addition to my arsenal of test gear. I finally gotten around to building a heat sink tester. I've only been thinking about this for a year, so that's pretty timely for me. With the tester done, I can move on to working on the new cooler for my server and actually have an idea if it will work before I install it. Now that's progress!
Here's wishing you all cool, fast processors and a great coming year.
|
|
I'm getting set to start on a new cooler for my home LAN server. The server is a K6 box with no temperature monitoring. Of course this meant I needed a way to monitor the temps. A Radio Shack thermometer comes to the rescue again. I've modified this one to read both temperature scales remotely. You can take a look at how I did it here.
This cooler is going to be a bit of a departure from the last few high performance coolers. The goal for this one is to make it noiseless. No fans. It also needs to be able to run 24/7 without maintenance. And since it has to cool a "high heat" K6, it needs to perform well. This is a tall order for any heat sink. This should be fun!
|
|
Seeing that I definitely needed some help with the MonoKote on the Water Cooler 4 project, John from Unlimited Hardware.Com sent me over some much needed suggestions on playing with MonoKote. I could have used this before I started!
"I have been building and flying R/C airplanes for about 15 years and I am very familiar with "Mistake-Kote"
I mean "MonoKote". The Tower brand has some advantages over the MonoKote because the Tower brand is a "low temp"
covering. It does not need as much heat to activate the adhesive and shrink and it is specifically designed
for foam applications.
I have found when using shrink covering that it is best to use the iron to attach one edge of the covering first.
Gently pull it tight then iron down the opposite edge pulling most of the wrinkles from it before you iron it
down. VERY IMPORTANT: do not iron it down on the entire surface, only at the edges. This will allow you to shrink
all the wrinkles out with a heatgun.
It is not necessary to iron the covering to the entire surface unless the surface is convex this is an unfortunate
mistake often made with shrink coverings that results in a poor wrinkled finish on airplanes."
I fall into the last category. I ironed that sucker every which way but right. Oh well, live and learn. Thanks to John, maybe you won't make the same mistake.
|
|
Just in time time for turkey day, I have latest project from the Benchtest Workshop. The Water Cooler 4 article is up. While taking a Celeron 366 to 682 sets no speed records, it is certainly a nice bit of a performance boost for this chip. I hope the method for attaching the cooler to the 370 socket gives you heat sink builders some ideas to improve upon.
Have a great day with family and friends.
|
|
|
|
For those of you who haven't gotten their feet wet with Linux, just do it. More fun than I've had in a long time (and more work, too!) I haven't done so much reading since cramming for MCSE. Hopefully by the end of the weekend, I'll have the kernel re-compiled one more time and the software bridge in place so I can see the computers on both subnets. I have it set up now, but there is way too much enabled in the kernel and there are files all over the place from experimenting with this and that. At this point in my learning, it's easier to wipe the drive and reinstall, than it is to clean house. When this is done, I'll take a break from the reading and get a couple of long overdue articles out.
See you soon...
So, after a couple of nights at 632 with
NO condensation, (even though there was 98% relative humidity at 75°F)
I decided to see what this chip would do. Since the RAM won't run
at over 117, I disabled it. 120 MHz, no problems. 124 MHz was
a bit of a push. This seems to be about the maximum this little Celeron
366 wants to do - and this required a few ice cubes in the reservoir.
But the site of this chip running Sandra at 682 MHz was worth the price
of admission! I won't be running at this speed - even when RAM prices
hopefully drop, but 660 MHz looks like it could be a nice safe place to
play.
|
|
|
|
BTW, the weird looking blue stuff is Monocote. I am no pro at covering styrofoam with this stuff, and it shows in the wrinkles, but it is air-tight and with an inch of foam insulation inside, has eliminated the condensation problems..... I think.... At least the slot one socket doesn't get too cold - though it is still filled with dielectric grease - just in case.
|
|
On the PPGA front, the 366 is still humming along at 632 MHz as I look for better RAM that I won't have to hock the house to buy. I just hope that the prices come down before PC133 becomes obsolete.
I finally broke down and purchased a digital camera. Starting with the half-way point in the upcoming Water Cooler 3 (PPGA) project, the quality of my photographs ought to become a little more consistent. Of course, this is just after I figured out that the add-on light meter for the flash was what was causing the problems. Oh well, at least I'll now be able to just keep taking pictures until they're right - instead of having to wait for them to be developed.
|
|
|
|
|
|
|
|
|
|
Jim's looking at PPGA stuff? Yep. And I guess that you know what that means. It's time for me to move on from my slot one adventures and join the rest of the world with overclocking a PPGA. Hopefully I won't trash a motherboard in the process this time.
|
The chart was taken from Intel's Plastic Pin Grid Array packaging manual - chapter 13 ~ available here. |
|
|
I have to have the worst luck with getting quick running Celerons. The 366 - slot one seems to be stuck at 567 MHz. I can't even get this one to beep at 578. It was suggested to me yesterday that I give up on the slot ones and try a PPGA. - I'm thinking on it. - It seems a shame to waste a cooling setup that will run -25°F on a chip that won't cooperate.
|
|
I'm still getting used to this Asus board. It has a different feel to it than the Abit. It's still too early to talk about it's stability, but it has a strange habit of returning to the default processor speed if the boot process is interrupted. This may be a setting that I have overlooked, but I don't see any mention of it in the manual.
If you run a PPGA processor, there's a good, new
review of four of the best heat sinks
for the overclocker over at John Bogush's Unlimited Hardware.Com. John has spent
a lot of time making sure that the comparison was accurate and fair. The results of the test may surprise you. John thinks
there's a new king of the hill. From his results, I'd agree with him.
I got out my recently purchased tube of Permatex dielectric grease and filled the slot 1 socket up with this stuff. All
the while, I'm thinking how I just blew a board and how I wouldn't be a happy camper if I did it again. I put the
processor back in with dielectric grease oozing out the top of the socket. I wiped the excess off and checked to see that
I now had an air-tight seal around the bottom of the insulated Celeron and the socket. An inspection mirror comes in handy
for this. I checked to make sure that everything was tight and fired it up. More anxious moments, then that beep. Then
Windows. That was 4 hours ago. My re-insulated water cooler is dry. The insulated slot 1 socket is dry. I pulled the
Celeron back out. No Ice. No water. Just dielectric grease, very cold dielectric grease. I've cleaned it all up and added
more grease and reinstalled it. So far, so good. The worst is behind me. I have no idea how this will work out over the
long run, but it looks promising. I'm going to continue to run at 550 and 2.2 volts for a few days to break in the chip a
bit more and then we'll see what I can get it up to. Right now, loops of Quake 2 demo1.dm2 will push the temperature up to
about +20°F.
I had planned to have the first of the water cooler articles up by now, but the site got mentioned on ZDTV's Screen Savers
cable TV program. (Thanks to Leo Laporte for the plug!) I got 2 days worth of hits in an hour. Along with the added
traffic comes added mail. Between working on the P3B-F and answering mail, I haven't quite finished up the article yet.
Hopefully in the next few days.
I think this means that over the weekend I'll be applying some polyurethane to a motherboard and digging through my
automotive stuff for some dielectric grease to go between the edge connector and socket. I'm not positive that this
is the best approach, but dielectric grease works well for boat electronics and off-road vehicles....
I have to say that I'm pretty pleased with the Asus so far. It took only about an hour to swap out the BH6, which was
serving back up duty, and toss in the P3B-F. The new Award BIOS is a little different interface than I'm used to with
the Abits, but real easy to set up. Asus's new No-Jumper jumperless settings are as easy, if not easier, than Soft-Menu 2.
I downloaded Motherboard Monitor 10 from Alex's site and
with the thermistor off of the BX6r2, was reading board temperature, diode temperature and heat sink temp again. I
found that in the few days that I had to go back to the BH6, I hated not being able to read the diode temp. And, I didn't
even have to do any soldering to get the diode to work!
Well, back to tweakin'.
A while back, after getting my Celeron 366, I was again in the situation of needing to lap a very warped Celeron
slug. If you've lapped your slug, you know how hard it is to keep from sanding the corners down farther than the
rest of the slug. After a little thinking and three bucks, I've come up with something that makes the job a bit
easier. Interested? Take a look at Lap that Slug.
I'm in the process of writing the first article on my attempts with water coolers. Give me a couple days and
you'll find out why once you start playing with these, you'll never go back to air cooled. (I'm now on my third watercooler!)
More to follow in the next few days.
To those of you who have inquired about
where to find the A-Trend slotket adapter in the States, the answer is
I haven't a clue. Even the links I found for these in the UK seem
to be dead. Maybe someone will enlighten me as to where to find these
adapters.
I have been waiting somewhat patiently
for my copper to arrive from Online Metals. Two weeks. I could
have walked cross-country and picked it up in that time. Hopefully
it will be here tomorrow and I can get going on chilling the 366 down a
bit. I'll be glad to get back into the workshop - I'm tired of typing.
-Added special IOCTLs to support Intel
Ultra ATA Companion
-Added support for Intel 82801AA/AB Ultra
ATA controllers
-Validated using various ATA/66 HDD devices
More NT BM drivers
"I've found a PIIXIde driver 2.05
from
The PIIXIDE.SYS file is the same at the
two location. The first is a pure Intel install (like BMIDE_NT.EXE) and
the second a HP Install which extract the standard Intel PIIXIDE.SYS and
PIIXIDE.INF 2.05.
This driver is the ONLY solution I found
to use my IBM 12.9 GB hard disk with a Tyan Dual Pentium Pro motherboard
(440FX) in busmaster mode under NT4SP5.
Reviews & News
John at John
Bogush's Celeron Overclocking Info has a cool review on KryoTech's
Renegade ATX-PE
The Sysop at Sysop
Solutions Network has a new review of the Asus P3b-f Motherboard -
6 PCI slots... interesting!
Cooling
"News from France :
For OC'ing, I've found the Asus and Abit
adaptators can't give you more than 567 Mhz, with both Celerons. But the
MSI and A-Trend can reach 616 Mhz without any crash (I can boot into Win
98 with an Intel heat sink, but it's not rock solid with 3D). I recommend
the A-Trend adaptator because it the only one that is able to reach 616
Mhz, and because it allows you to use an Alpha P125, or any kind of slot
1 heat sink. Here are some pictures
of the result (the heat sink attached at the back of the adaptator isn't
a sandwich, it's only because you need to get similar pressure at the back
of the PCB plate if you don't want to break it. Of course, you need
a little sheet of plastic between the heatsink and the adaptator, for insulation).
With the combination of A-Trend + SL36C
+ Alpha P125, I can run Prime 95 for days without any error."
Toinou
For the moment, the scariest part is behind me. After a marathon weekend in the workshop,
where I cleaned and coated the P3B-F with polyurethane, sealed the bottom of the slot 1 socket with silicone sealer, and
said a couple of prayers to the motherboard deities, I plugged in the hopefully waterproof motherboard. After a couple
of anxious moments, I heard that beep that says, "I'm alive." I swapped out the Celeron 300A for the 366 with its dual
40 mm peltiers and water cooler, and was able to get into Windows at 550 MHz. Idle temperature, -20°F. I shut down and
inspected the edge connector of the Celeron. Ice. Time for the next step.
Well, I'm up and running with my new motherboard tonight. An Asus P3B-F 6 PCI - 1 ISA.
This is quite a departure for me, as my last 3 boards have been Abits, but Abit's BE6 just wasn't what I wanted
and I had already had a BX6r2 (though a little worse for the wear right now). The board was not actually a planned
purchase, but one that was a result of a dual TEC watercooler that got a little colder and pulled a little more
moisture out of the air than I had bargained for. No visible condensation and there was enough insulation around
the cold plate and Celeron to keep the diode well into the sub-zero zone. However, I hadn't planned on moisture
build up INSIDE the slot 1 socket. A lot of moisture. Let's just say when the board died and I pulled out the
Cele, there was a wet edge connector and water all over the inside of the socket. Bummer.
Two nights in a row with something new to add. That has to be a record for me.
It's been a while since I've put anything resembling an update here,
but I have a couple of articles in the works and have finished one up tonight. If you've been
wondering what's been going on in the workshop for the past few months, take a look at the first
of a series of prototypes I've been working on.
After many hours of editing, I'm finally finished
with the first step of overhauling this website. So far I have made
some changes to allow the pages to display correctly (hopefully) with higher
resolutions. Next, I'll play around with the design. Many thanks
to Dan Larsen from Okanagan
University College in Kelowna, British Columbia for some help with
the code. I didn't realize how many pages I had acquired until I
sat down to edit them all by hand....
There are some interesting things floating
around for NT4 and Bus Mastering. Vlad sent me a link to some new
drivers from the Asus DE FTP site that give support for ATA 66 disk drives
and Intel 82801AA/AB - ICH/ICH0 as well as support for the Intel 82371AB/EB
- PIIX4/PIIX4E and earlier chipsets. The file is bmn4_400.zip.
I haven't had a chance to try them out yet, but I will soon, I hope.
The added support is listed as:
Gilles tells me that there are also a
couple of new files from the HP site. Here are his comments:
http://www.hp.com/cposupport/information_storage/software/nt205_00.exe.cons.html
http://www.support.kayak.hp.com:8000/kayaksupport/level4/41ked3l1us.exe.html
--------------------
Thanks guys :-)
I have finally taken some time to catch
up on what's going on around the net. There are a couple of good
articles, that if you haven't seen, you ought to check out.
(They seem to be having DNS problems tonight
- try them at 204.50.146.43)
The idea for a jig to keep the Celeron
slot 1 parallel while sanding the slug flat worked like a charm.
I took this one down using 220 grit, then 600, then 1000, then 2000 waterproof
paper. (Wet, of course!) This Cele is now F-L-A-T. I took some shots
of the way I was able to stop the SEPP from rocking while I sanded, but
due to the fact that I have to develop the pictures, I won't have them
up till the weekend.
Here's some interesting thoughts from my friend
Toinou.
We have found the PPGA 366 SL36C Malay
to be excelent for OC'ing, as many others sites can report it like us.
The interesting point to notice is that
many users need an adaptator 370/slot 1, because of the large number of
slot 1 MB. But all thoses adaptators are not suitable for OC'ing.
I'm running two different L925 at 616 Mhz 2.3 v, with my BX6-2, without
any problem ...with an Alpha P125 !
www.hardware-fr.com
 .
.
A couple shots of Toinou's Celeron 366 PPGA on an A-Trend adapter with
an Alpha P125.
My thoughts. 550 without a TEC is certainly the way to go if your Cele will do it. No chance of condensation here. Six months ago, very few people even thought that the Mendocino core was capable of these speeds. Way too cool!
Because I'm looking for more than 550, I haven't tried the "no TEC" approach yet. I considered going with a PPGA, but was concerned with the condensation caused by the low temps I want to run. I have yet to see a solution to guard against the corrosion that will certainly develope around the pins where the Celeron fits into the socket. I think the most viable solution would be to seal the edges of the socket and fill it with a medium to high viscosity grease (automotive distributer dielectric grease or vaseline come to mind). How you'd seal off the center of the socket and keep the moisture from dripping down from the underside of the processor are a couple of things I haven't worked out. That's the main reason I went with another slot 1.
Speaking of my slot 1, I've just finished putting the third coat of polyurethane on the 366. I'll let it harden over night and start sanding the slug tomorrow. I've been thinking about using 4 nuts and bolts attached through the Cele's mounting holes to act as a jig to keep the slug parallel with the sandpaper while sanding. I think that those of you who have tried flatening the slug out will agree that trying to keep the Celeron from rocking while sanding it is very difficult. Hopefully this jig will make the job a bit easier.
|
|
There was a computer show in our area today. A once a month deal that I haven't been able to go to in 6 months because of my schedule at work. I got a little promotion and weekends off - so I hit the show. I found a week 25 - 366 Cele slot one and grabbed it. I paid about $10 more than the low Pricewatch price, but the guy knew what he had. Once electricity was restored after a severe storm knocked power out to our house for 6 hours, I strapped on the watercooler and gave it a try. --- No sanded slug (and it's warped like all the rest of them) --- no waterproofing (just going to try it, you know...) --- not even any insulation ( c'mon, it's a new toy....) 550 right out of the box. Of course I did give it some special attention -- 5 minutes at 458 to make sure it wasn't DOA. It hasn't even seen 366 yet ;-) Will we hit 616 after some work and a good burn-in? Only time will tell.....
|
|
My question to "the undertaker." (Yes,
the undertaker....)
...snip...
> I liked your letter so much that I put the whole thing up on the
news page. Thanks for the information.
> I have just one question. Why are you running your modem under
water? I laughed when I read that. >Does it run hot?
Or is this just for fun?
...snip...
Why am i running my modem under water? umm, i didn't wanna waste an
expensive CPU, when i could test it on my 3 dayz old modem...! ISDN
by the way, i did it for science, and for fun. I'm trying to find a way
of cooling my HDD's too though... 80 degrees celsius is kinda HOT!
(this is after i overclocked)
A Norwegian comedian... I guess that I asked for that. ;-) And no, I'm not going to ask about the hard drive!
|
|
"I'm no good in English, and i tried to find "LAKK" in my wordbook, and found multiple alternatives... so, when i say LAKK, i mean: Sealing wax, sealer, lacquer, varnish,
I happen to be a person that is making Paint, and Lakk, and i'm also a computer nerd :) (arn't we all?)
I read about how you insulated the celeron,
and descided to check it out...
What i found, was thet you had used the
(after what i can make) second best
as Polyurethane modified Acetane is a
little bit bigger than
Urethane modified Acetane, so the latter
will conduct heat better, and will also
have a tighter coat.
I work at a norwegian company called STAR,
and so i found a good product
for the case, and i found that "Star Edel
GulvLakk Blank" (Star Edel FloorLakk Clear)
(make sure there are no color pigments
in it, cuz those make it badder in quality)
should be good. Also make sure that it's
OilBased!!!!! (vaterbased can't take the
temperature changes!)
A little "plus" with this type is that
it contains a light filter... :) so, the Lakked stuff
won't get yellow, and bleak... :)
We actually do make one type of Lakk that
is better, but it's beeing discontinued, cuz it's
VERY dangerous for humans... :(
you have to have permission from the authorities
before you can buy it!...
I have not tried Lakking my CPU yet, but
i think i will take the risk. I have though tried
to Lakk my modem, and it worx just fine,
even completely UNDER water for hours..
(under water right now actually)
USEAGE: paint 6 coatings, with 1-2 hours
periods between them, then wait 8-12 hours
before you heat/cold it. The more
humidity in the air, the faster & better the Lakk gets,
how stupid it might sound... Just
DO NOT try to have vater on it before it's dry!!!
It said fzzzt, cuz the Lakk had not yet
covered all the air pockets completely...
By the way, thanx for a great page, it's
really helped me A LOT!
I'm running a PII-333Mhz @ 500Mhz with
no sweat.. gonna run it at 515Mhz soon, when
i get my Peltier..
-=Dead2=-
You do have permission to post this, or
use parts of it, as long as you quote it."
-----
Consider it quoted.....
I let you know why he runs his modem under water when I find out.
|
|
Special thanks to Toinou, who wrote an article for Hardware-Fr. on peltier cooling. If you read French, or (like me) are willing to cut and paste to babelfish translations, you will not be dissapointed. This is one of the better TEC articles I've read.
The temperature in Virginia topped 102°F today. I forgot and left the central AC vent closed in the computer room. The result was a room temp of 88°F before I cranked up the extra window AC unit. It was a good test for the water cooled TEC, though. Within 5 minutes, the Cele was hummin' at 1.6°F. Not too bad....
|
|
|
|
Elsewhere in the workshop, the new, water-cooled "Sub Sandwich" is alive and has been running for a couple of weeks while I fine tune the insulation and put the cooler through some torture. So far, I have seen no single peltier sink that offers this kind of performance. And, it's a closed system. No buckets of ice water to re-fill for this puppy. I'll have a story up on it in the near future.
6-19
I know that it's been suggested that I
have somehow fallen off of the face of the earth. However, to paraphrase
an old line, "Reports of my demise have been greatly exaggerated."
Trying to get some heat sinks produced is turning into more work than I had first anticipated. I've found quite a few businesses who will produce them for me, but the end cost in quantities of hundreds is more than I feel is a fair price. Trying to machine them myself is out as it takes about 4 hours per sink. We'll see how things progress this week.
Since I have been looking for suppliers for the materials, I have been doing a bit of reading on the thermodynamic properties of metals. For copper, it turns out that the purer the copper, the better the properties. If hardness is not a concern, oxygen-free copper seems to be the way to go. Beryllium-copper alloys, while less malleable than pure copper, are down on the list as far as thermal conductivity is concerned. I've been playing with 1101 copper and find that it suits my purpose well.
In aluminum, 6061 and 6063 have the properties I'm looking for.
Encasing one of my new heat sinks in a copper jacket is working out well for my first attempt at a water cooler. Not wanting to have a open bucket of water in my computer room, I have opted to make a closed system. Using a automotive add-on transmission oil cooler as the radiator and a pump designed to run non submerged, I can keep the heat sink temperature at about 8°F over room temperature with a 40mm TEC running full tilt on the processor and Quake2 running in a loop. With single digit Fahrenheit temps at idle, the single 40 TEC can't pull the heat out of the processor fast enough when stressed. This results in the internal diode reading below freezing at idle to the mid seventies when pushed hard in an 80°F room. Next on the agenda is dual 40mm peltiers. For the heck of it, I tried stacking a 30mm TEC on the bottom of the 40 TEC. This gets *very* cold at idle, but is worse than running just the 40 when the processor is working hard.
Condensation has finally reared it's ugly head and I had the system shut down due to moisture on the Celeron during a near 100% humidity day. In a decidedly low tech approach, I baked the moisture out of the chip with a low temperature setting in the oven and added a few coats of polyurethane to seal the SEPP. I've tested it from sub zero to cooking it at 140°F by running only a small heat sink with no fan. So far, so good after a week of torture.
The last item is an interesting one as I had not expected it. I found that I was getting condensation on the Aavid heat sink that I have been using as a back plate for the Celeron. The "cold" was passing through the Cele's circuit board and cooling the Aavid down into the 40's. I have now replaced the Aavid with a plate made of fiberglass insulated with closed cell foam. This was good for an instant lowering of the slug temperature by 8°F. I'm now working on insulating the whole package, water-cooled heat sink and all.
So, while I haven't done much in the way
of articles lately, I have a lot of material to write about. Hopefully
it will be soon.
6-7
Just a quick update on what's going on
in the workshop.
I'm working on a new heat sink design and am in the process of soliciting bids for building it. It's small enough to fit all of the mid-tower cases I have encountered and if the first prototype is any indicator, it outperforms everything I have tested to this point. More on that once I get a couple more bids. -- If you have a machine shop and are interested, please email me --
After playing with peltiers for a while now, I have decided to follow some ideas I have seen on the web and try my hand at a water cooled peltier. Yeah, I know, call a plumber. I have assembled all of the parts I need, except for the pump - which should arrive this week. Of course, I'll do a step-by-step and you'll get to see me either fall on my face or succeed. I'm kind of hoping for the latter. ;-)
Last, it would seem that I didn't do a very good job of explaining which boards benefited from the addition of the capacitor and resistor to get the thermal diode to read on the BX6r2. I've tried to make that a little more clear and have included the results of the Benchtest survey on which versions and serial numbers of the BX6r2 have the parts included and which don't. You can take a look at the updated page here.
5-31
Finally. The review
of the Alpha P52120 pin-type heat sink is up. Great performance in
a smaller package.
Things have started to settle down here and I'm getting close to having all present commitments taken care of. Maybe I'll even be able to crank out a couple interesting projects soon. I've just spent the last few days struggling with building a system that refused to cooperate. I got as far as having the OS and assorted programs loaded with no conflicts anywhere, only to have it refuse to boot into Windows (even in safe mode) when the box was moved. I think I have finally tracked it down to a faulty hard drive. Of course, that wasn't the first thing I checked.... It's been said that we are never given challenges that we can't meet. Sometimes I wonder....
Enjoy your Memorial Day, and thanks to those whose service made the day possible.
5-23
Its been a busy couple of weeks, and I
have not had a lot of time to do anything other than finish the testing
on the Alpha P521M20 and get about half way through a new project.
I'm waiting on my photographs to return from the developer an should have
the article up early in the week. At that time, I should also get
to see if the repairs to my camera worked or not. ....I hope so.....
In the mean time, I got a neat email about one way of dealing with the lack of local availability of the capacitor and resistor needed for the BX6r2 diode fix. I think you'll find that this is some really good information. Check it out here.
5-9
I have finally finished up the article
on the Alpha P125M60. Included are tests of the sink with and without
TECs. This is one very nice sink. I have another Alpha sink
that I plan to start testing this week. This is a smaller pin-type
sink that looks like it will fit most mid-tower cases without having to
remove the power supply to a remote location.
Just so you don't think I'm the only individual who's "cooling obsessed," here's a link I picked up over at Overclockers.Com: The Hack Shack, a guy devoted to running his processor at sub-zero temperatures. Some interesting stuff.
5-1
To start off this month, I have finally
finished up the last installment of the Cheap Sandwich project. The
last bit includes adding some more powerful 60 x 25mm fans and swapping
a 40mm TEC for the 30mm unit I started with. Not a bad for $40 and
a little work. The article starts here and the
last installment is here.
The Alpha P125 - peltier sandwich testing is progressing along. I am now running a 40mm TEC in this one too. Performance is as good with this sink as any I've played with.
Speaking of Alpha's, John Citarella over at Overclockers.com has put together an order for some of the P125's as well as some of the socket 7 / socket 370 Alpha units. He's selling these for less that I got mine directly from Alpha. If only I'd known.....
Finally, a guy I have been having some
cooling conversations with, who goes by the name of Sysop Smith, has put
together a super page on overclocking his Celeron 300A using (what else?)
an Alpha P125. Well done! Sysop's
Page
Thanks!
Thanks to all of you who have written.
The volume of email I've received is more than I can reply to, at the moment,
if I hope to keep working on projects. I will try to reply to as
many as I can as more time becomes available.
Jim
4-26
I've been having a great couple of weeks.
First, Darnel comes up with the hardware fix for making the Abit BX6r2
able to read the Celeron's internal temperature diode. Now, with
the circuit working, Alex
van Kaam's Motherboard Monitor can give me the information I've been
wondering about for a long time. How much heat is too much?
To do this, we will need to be able to observe the temperature of the processor
through some controlled stress situations. I thought that plotting
the CPU temp every 10 seconds or so sounded about right. I mentioned
this to Alex and much to my surprise, I had a modified version of Motherboard
Monitor 4.03 in my mailbox the next morning. This version (MBM 4.04)
is now available at Alex's site. With MBM now able to log temperatures
every 6 seconds and export them as text, html, or Excel files, I have all
of the tools I need to do some serious playing. Maybe we'll finally
be able to come up with an answer when asked, "How hot is hot for an overclocked
Celeron." Neat! Thanks Alex.
I've been threatening to put up the information on my new InWin Q500 for a while. I finally got the pictures back from the developer and have scanned them into the article. Forgive the poor quality of the pix, but I just found out that the flash for my Minolta X-700 is not doing a proper job. I may have to break down and get a digital camera. This business of waiting a couple of days to find out that all of my pictures are under-exposed is the pits. At least with a digital, if the pictures don't turn out, you know about it in time to retake them.
Anyway, here's the link to my Q500A article.
4-24
I've had the opportunity to play around
with the Alpha P125 for a bit. I have it attached to the Peltier
Sandwich and have to say that it is the most effective commercially available
heat sink I have come across. It has a rather thin base which is
probably a good thing for non TEC use, but for my purposes, I think the
addition of a "hot" plate under the sink will make this good sink even
better. More on this after some additional testing.
My friend Harvey, a designer of audio electronics, had this comment on the BX6r2 Temperature Diode Fix:
I recommend that ANY user attempting the hand fix in your article use standard leaded components.
1. They are big enough for full sized human beings to handle.
2. They won't go up in a cloud of smoke when touched by a conventional small solder iron.
3. You can easily buy them is less than 2000 pc. quantity. Surface mount parts are almost impossible to find in single pieces, except as samples from a distributor -- and then, only if you can convince them that you are a qualified prospective customer for a quantity purchase.
4. Reversing the procedure (for warrantee purposes) is easy, if needed.
While I have found a source or two for the 0603 components, his words ring true. The size of the parts is so small that they are extremely awkward to handle. Forewarned is, well, forewarned.
4-22
With the internal temperature
diode working on the BX6r2, I got to work on finishing up on couple
final modifications on the InWin Q500. This is one nice, big, cool
case.
The P125 and P52120R-45B heat sinks from Alpha got here today. They're not quite as big as I'd thought they'd be, but are still substantial. The P52120R-45B looks like it will fit well in mid tower cases like the A500. The P125 looks a little too tall to fit between the board and power supply. I'll look into this more tomorrow.
In the hope of compiling a list of the
motherboards / revisions that do not have the resistor and capacitor installed
in the R266 and C241 locations, I'd appreciate some input. I'd like
the revision number and (if you can) the serial number and whether or not
the board has the
components installed from Abit.
You can X out the last 2 digits of the serial # if you wish. The
revision and serial numbers are located on the #2 ISA slot.
Please reply with "yes" or "no" included in the subject and reply to: diode@benchtest.com
So far, I've been informed that 3 r2.01 boards with serials in the AH002XXX range came with the resistor and capacitor.
15 r2.02 boards with AF0100XX, AF0110XX, AG0030XX, AG0290XX, and AG0297XX came without.
4-21
Well, it's been an interesting couple
of weeks. I did the cooling modifications to my new Q500 and got
the BX6r2 (2.02) all set up only to find that the main thing I wanted from
the board - the ability to monitor the internal temp diode of the Celeron
/ PII / PIII - didn't work. After numerous reconfigurations in an
effort to isolate the problem, I took the board back and got another, only
to find that this one didn't work either. After much discussion of
the possibilities on the Abit newsgroup, one of the contributors came up
with what turned out to be the fix. After soldering in some *very*
tiny parts, I'm finally up and running with a working thermal diode.
Yeah!
For those of you who haven't heard about the fix, I've put together the information here.
With my new toy working, it's back to heat sinks. I should have some new reviews up in the next few days. I also have the 60mm fans, so there'll be more on the big sink and cheap sandwich.
4-9
The article on the Meci heat sink project
is up. Appropriately titled Cheap Sandwich.
While I'm still waiting for my 60mm X 25mm fans to arrive, I did go pick up a Abit BX6-2. I have been an Abit owner for my last 3 motherboards and I am as impressed with the layout on this one as any that I have owned. Of course, I don't have it up and running yet.... because.... I also picked up a new case to put it in. I decided on another InWin. This time I went for a Q500A. Lots of room in this one and now I can go for come really big sinks! Now, you know that I can't run anything in stock configuration, so a couple of small modifications are in progress. How many holes can I cut in this one? Just a couple to start with....
Also, I got a response from Alpha. A couple of new sinks will be here soon. In addition to the one I had originally planned on, I'm also getting one of the P125C's that has the "cooler crowd" buzzing at the moment. While the P125C appears to be too big to add a TEC and cold plate to and fit into the InWin A500, it'll do well in the Q500. Imagine that, buying a case to fit a heat sink. (Well, not really, but it was one of the factors.)
4-6
I've been busy in the workshop (and elsewhere)
lately. While doing some modifications on the BIG sink, I needed
a TEC and sink to keep me purring along in the 500 zone. I had a
40mm
TEC with heat sinks attached (#580-0047) from Meci and with some pretty
quick modifications, I have turned it into a fairly decent peltier sandwich.
With my 50mm X 10mm fans, the sink gets a little too warm for my tastes,
but I have some 60 X 25 fans (592-0690
- Allied) coming that should do the trick. The nice thing is
that the sink and TEC cost less than $20. As soon as I can sit down
for a bit, I'll write up the conversion process. BTW, this
one came out looking nice for a change!

Meci #580-0047
As I said, I've also been working on the BIG sink and have been splitting the fins in half to increase their surface area. With the temperatures in Virginia warming up, I will need all of the heat transfer I can get. Also in the near future, I have a impressive looking Alpha heat sink coming. This is a different model than the one you've probably read about on John Bogush's site. A great review, by the way. If you haven't read it, do so.
And... I have been bitten by the hardware bug again. I have decided that a Abit BX6-2 is in my future. Being able to measure the interior temperature of the processor is something that I have been wanting for a while. With this board and one of a couple of monitoring utilities, I will finally be able to do it. Time to see how accurate my ideas on the inside temperature of these chips are.
Hopefully I'll have some new pages up soon.
3-28
I've put up the first part of building
a new sink for the peltier sandwich. This is going to be a ongoing
project until I can come up with a setup that can be put together from
easily obtainable components. The first step is to see how much heat
sink I really need and how much performance can be gained from a BIG
sink. So far, the results are not quite what I expected.
I've been informed by quite a few people that the TEC I used from Meci is sold out. Similar units are available from Melcor, Tellurex, and others. I'll try and put up some part numbers in the next day or so.
3-25
Thanks to a sharp-eyed friend of benchtest.com,
I now have some new links to the AmnHLT CPU cooler program. They
can be found in the article. Looks like
I'm going to need that Cyrillic translator again.... Thanks for the
links David.
3-25
I've had enough requests for more information
on the Peltier Sandwich that I finally assembled the information
on a separate page. I've also included a file that can be downloaded
and printed from MS Word with templates for the hot and cold plates and
insulation. I hope this answers the questions some of you had.
template
page
On the "what am I working on," questions... After trying in vain to find a commercially available heat sink of the right dimensions, I decided to attempt to build my own. I started with a 3 pound block of aluminum and beat on it until I had some semblance of a heat sink. To use one of my overworked lines, "It ain't pretty, but it works well." I'll have some pictures up soon.
I am still looking for a suitable, commercially available heat sink to use in place of the Fullway. So far I have about worn out my usual search engines without coming up with one that is large enough to handle the heat produced by the TEC. Has anyone seen anything big enough? It needs a base about 1/4~3/8" thick and fins that are at least 1.5 inches tall. I've seen a couple of manufacturers offering extrusions that would fill the bill, but nothing on the retail level. Please let me know if you run across something.
Speaking of the Fullway, I sent Joe at Overclockers.Com the sink and plates. Hopefully he can make some time in his busy schedule to give it a test.
If all goes as planned, there should be some more updates by the weekend.
3-18
For those who have been asking for a picture
of how the temperature probe was mounted to the Celeron A, I have included
one in the thermometer article.
3-4
For those of you who were wondering, unfortunately
the Fullway heat sink used for the 504 MHz article
is presently not available in the U.S. They are, however, looking
for distributors. If you need a few thousand of these, I'm sure they
would love to hear from you....
You can reach them at: fullway@fullway.com
3-1
For those who want to see what is really
happening with temperatures inside the Celeron and PII processors, Joe
Citeralla's Overclockers.com
has a great article on one guy's success in building a circuit
to monitor the temperature diode inside the processor.
I was hoping that Abit would introduce this circuitry into their motherboards,
but that is not yet a reality. Time for me to get out the soldering
station and give it a try.
2-26
The final chapter in the 504 MHz experiment
is finished. The complete article starts here,
and the most recent section on peltiers and getting the processor stable
at 504 begins here. I hope you enjoy reading
about it half as much as I enjoyed doing it. All stories should have
as good of an ending as this one did.
2-23
A couple more days of testing and I'm
now running stable at 504 and 2.2 volts. I've got to say that this
has been one very interesting couple of weeks.
I'm waiting for the pictures to arrive and with a little luck the article will be up Thursday or Friday.
2-20
Well, I wasn't quite prepared for the
results I got the other day, but it was good news, indeed. After
3 tries at assembling a peltier that could get rid of the Celeron's heat
AND the heat produced by the TEC itself, I succeeded in making a half-way
decent peltier heat sink. I also have ended up with a 300A that is
stable at 504 at 2.4 volts! I have been trying to get it to lock
up or crash for 3 days now without so much as a hiccup from it - using
every stress inducing benchmark and game in my possession. Considering
that this is the same chip that I could only get to run at 504 by using
2.5 or 2.6 volts and that it was less than stable using a big dual-fan
heat sink, I'm impressed.
It'll take me a few days to get the article written....
2-16
I seem to be falling into a pattern of
taking about two weeks before I get a chance to update this site, but it's
the best I can do at the moment.
I've been playing with trying to get my unwilling 300A to run stable at 504 and have actually made a little head way. I haven't had to reformat a drive due to errors in a couple of weeks now ;-) That is an improvement. While this isn't the most practical testing I have done, it's been a lot of fun and, as usual, I'm learning some new things in the process. I had hoped to have a completed article to put up, but a delay in getting some peltiers has put the final testing on hold until they arrive. I figured that half an article was better than none, so here's the first half. I hope you enjoy it.
2-1
Someone once said, "Good things come to
those who wait." It would appear that my period of waiting to get
my Cele to run at the illusive 504 MHz is finally over.
I was hitting the usual sites this morning (when I should have been working) and came across an interesting item at Andy Drake's BXBoards concerning a program which allows you to set the front side bus speed from within windows. The link he had for the program was down, but with a little searching I came up with it. (Andy may have the link repaired by now.) While the program didn't allow me to successfully reach 504, it did get me off my butt to give the 500 mark a try again.
After flashing to the HN BIOS with the voltage set to 2.1 (to give me up to 2.5 volts to play with), I set off to either hit 504 or fry the processor trying. Pushing past 2.3 volts, which I'd tried in the past, I set the voltage for 2.4 and crossed my fingers. Success!
It's a little early to tell how stable the chip will be at this high of voltage, but the early tests seem to be encouraging. So far, I've run some benchmarks and a couple of rounds of Quake2 timedemo and it has been solid as a rock. The next step is to put it into a loop of timedemo and go to bed. If the house hasn't burned down by morning and the demos are still running, I'll move on to more tests.
At this point, I'm rather amazed at how cool the chip is at this temperature. With my room temp at about 68°F, the processor at 464 Mhz runs at about 72° at idle with a cooler program running (today I happen to be running Rain). At 504 the temperature is about 2° higher. There is an increase in temp when running programs, but it is still cool enough that I haven't bothered to remove the cover off the case. I guess my heat sink and case cooling are doing their jobs.
Yeah, I too would have preferred a Cell that would hit 504 at 2.0 volts, but that's not what I have, so I'll just have to play with this one.
If you're interested in playing with the front side bus from windows, the program is called SoftFSB and it can be downloaded here.
1-28
While I have been slowly finishing a half
dozen projects and prior commitments, Charlie's been busy putting together
another addition to the site. This time he's worked up a step-by-step
article on removing the stock cooler cartridge from a PII - Klamath and
attaching an aftermarket heat sink. You gotta love those neon green
wire ties! Check it out here.
1-20
It's been an interesting couple of weeks.
I've been busy with attempting to cool a *very* overclocked Millennium
G200 AGP. I have to say that this is turning into quite a challenge.
At this time I can't seem to get the video chip to run much cooler than
15° over room temp without the fan rendering the #1 PCI slot of the
BH6 unusable. I just picked up some more aluminum sheet stock and
will give another attempt at building a large, wide, and thin heat sink
this weekend.
In the mean time, my friend Charlie has put together a neat article on getting the heat out of his case without resorting to cutting holes in it. (Unlike my case, which is beginning to resemble swiss cheese.) Take a look at his solution here.
Charlie, a professional metrologist, has been instrumental in my being able to accurately measure the temperatures of the various components I have tested.
1-3
I finally have the reviews of Waterfall
Pro 2.1 and AmnHLT 1.0 up. Also, due
to more changes in my system's configuration, an updated CPU Cooler Current
Tests has been added.
The installation of a Diamond FirePort 40 SCSI card and Plextor DiskWriter 4-12, in themselves, shouldn't have made much difference in the overall results of the CPU cooler tests, but re-optimizing the system to take advantage of all of the new found space I received from finally removing gigabytes worth of saved programs and files has made for a nice speed increase. Of course, being me, this was a great opportunity to reformat the disks and try to get rid of the disk errors caused by one too many attempt at pushing the Celeron A to the 500 mark.
I had been thinking along the lines of a low level format to see if I could cure the bad clusters marked on the drive when I came across a neat little utility on Quantum's site. Named Zero Fill, the program writes nothing but zeros to the hard disk. This completely erases all previous data on the disk, including partitions, viruses, and yes, you guessed it, my marked bad clusters. Needless to say, I'm impressed with the program. Another tool for my expanding arsenal.
Thanks to Martin and Jason & Wendy, I now have a manufacturer and a URL for the CPU Cooler heat sink I modified for the Celeron. Vantech is the manufacturer and their website may be found here. The model number is 4535, with the 4535H having a little different fan arrangement than the one I own.
Current and upcoming projects include an
active cooler for the Celery (One more shot, however long, at the 500 barrier.)
A couple of heat sinks for my Matrox G200 that runs a little warmer than
I'm happy with, and a couple of "how to" articles.
|
|